Networking
OCI VPN IPSec Connection을 활용하여 Libreswan(BGP Routing)과 VCN 연결하기
Table of Contents
사전 준비사항
사전에 다음과 같이 서로 다른 두 리전에 VCN과 VM 인스턴스가 필요합니다. VCN 생성은 아래 블로그 포스트를 참고합니다.
OCI에서 VCN Wizard를 활용하여 빠르게 VCN 생성하기
여기서는 온프레미스용으로 춘천 리전, OCI로 서울 리전을 사용하고, 다음과 같이 VCN을 생성해보겠습니다.
춘천 리전 VCN (온프레미스)
- Name: OnPremise-Libreswan
- CIDR Block: 10.0.0.0/16
- Subnet: 10.0.0.0/16 (Public)
서울 리전 VCN (OCI)
- Name: VCN-SEOUL-HUB
- CIDR Block: 172.16.0.0/16
- Subnet: 172.16.0.0/24 (Public), 172.16.1.0/24 (Private)
SSH 접속을 쉽게 할 수 있도록 Public Subnet에 구성하여 테스트를 합니다.
추가적으로 춘천 리전에 Libreswan 설치를 위한 인스턴스(Libreswan)와 테스트를 위한 인스턴스 (OnPremise VM Instance-1)를 준비하고, 서울 리전(OCI)에도 테스트를 위한 인스턴스(OCI VM Instance-1)]를 준비합니다. 리눅스 인스턴스 생성은 아래 블로그 포스트를 참고합니다.
춘천 리전 VM 인스턴스
- Name: Libreswan(CPE)
- Public IP: 144.24.84.145
Private IP: 10.0.236.153
- Name: OnPremise VM Instance-1
- Public IP: 129.154.61.29
- Private IP: 10.0.85.10
Libreswan을 설치하는 인스턴스의 경우 인스턴스 생성 시 부트 볼륨 옵션 중에서 전송 암호화 사용(Use in-transit encryption) 옵션을 체크해제 하여야 합니다.
서울 리전 VM 인스턴스
- Name: OCI VM Instance-1
- Public IP: 146.56.156.213
- Private IP: 172.16.0.93
구성도 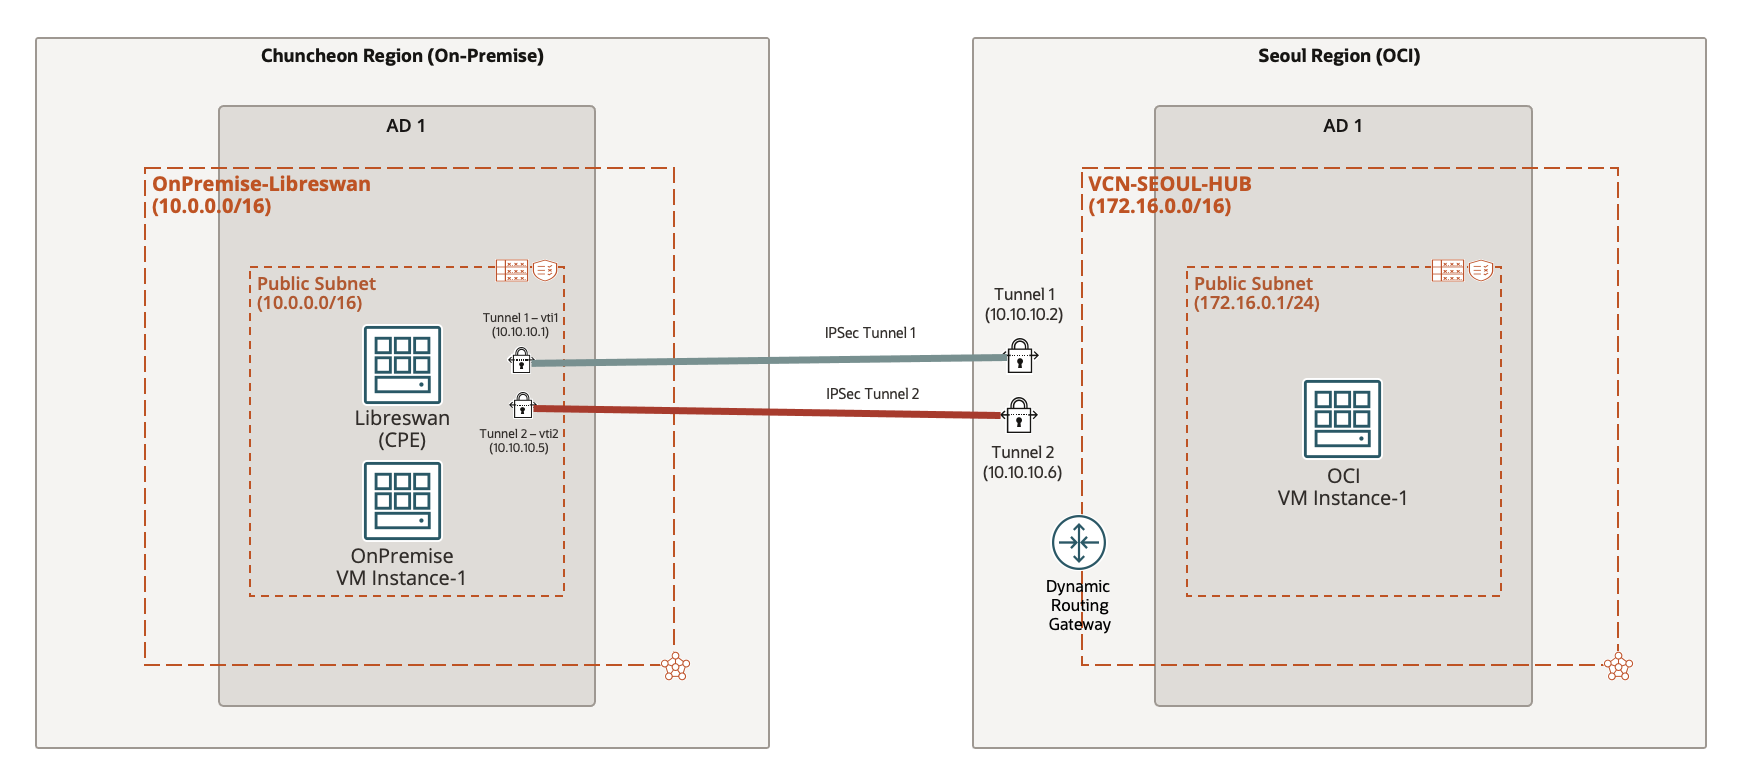
DRG (Dynamic Routing Gateway) 생성 및 서울 리전 VCN 연결
Dynamic Routing Gateway (이하 DRG)는 OCI의 특정 VCN에서 동일 리전의 VCN이나 다른 리전의 VCN, 혹은 온프레미스 네트워크와의 연결을 지원하기 위한 가상 라우터입니다. OCI VPN IPSec Connection을 생성하기 위해서는 이 DRG를 미리 준비하여야 합니다. DRG는 서울리전 (OCI)에 생성합니다.
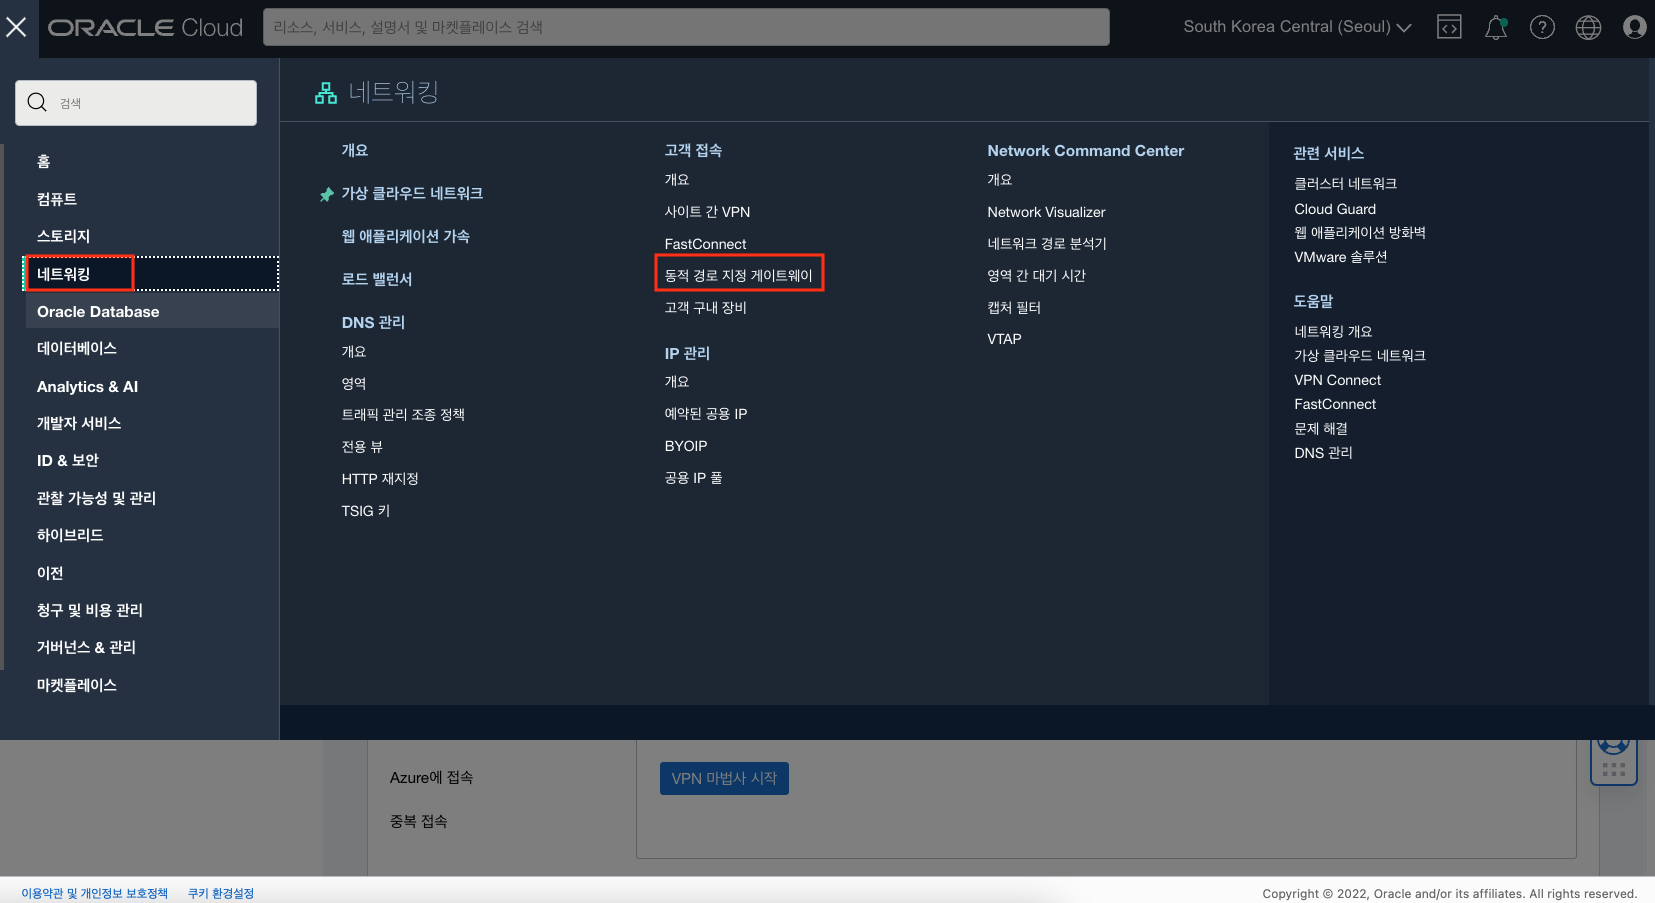
DRG를 생성하기 위해서는 다음과 같이 서울 리전에서 메뉴 > 네트워킹(Networking) > 고객 접속(Customer Connectivity)으로 이동 후 동적 경로 지정 게이트웨이(Dynamic Routing Gateway)를 선택합니다.
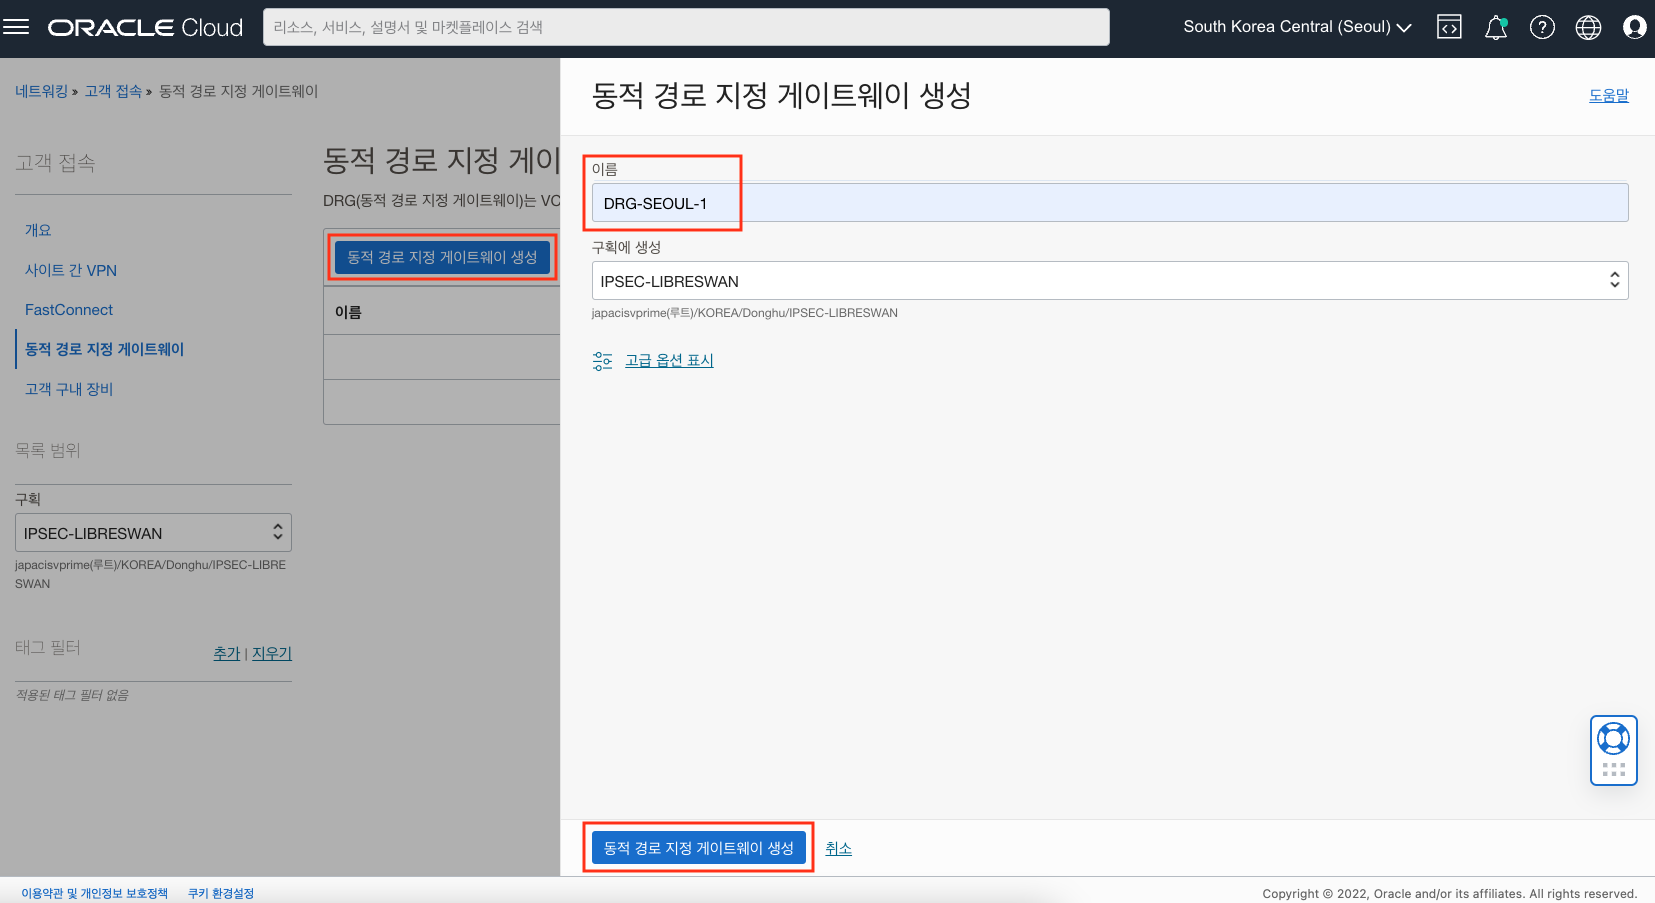
동적 경로 지정 게이트웨이 생성(Create Dynamic Routing Gateway) 생성 버튼을 클릭하고 다음과 같이 DRG를 생성합니다.
- Name: DRG-SEOUL-1
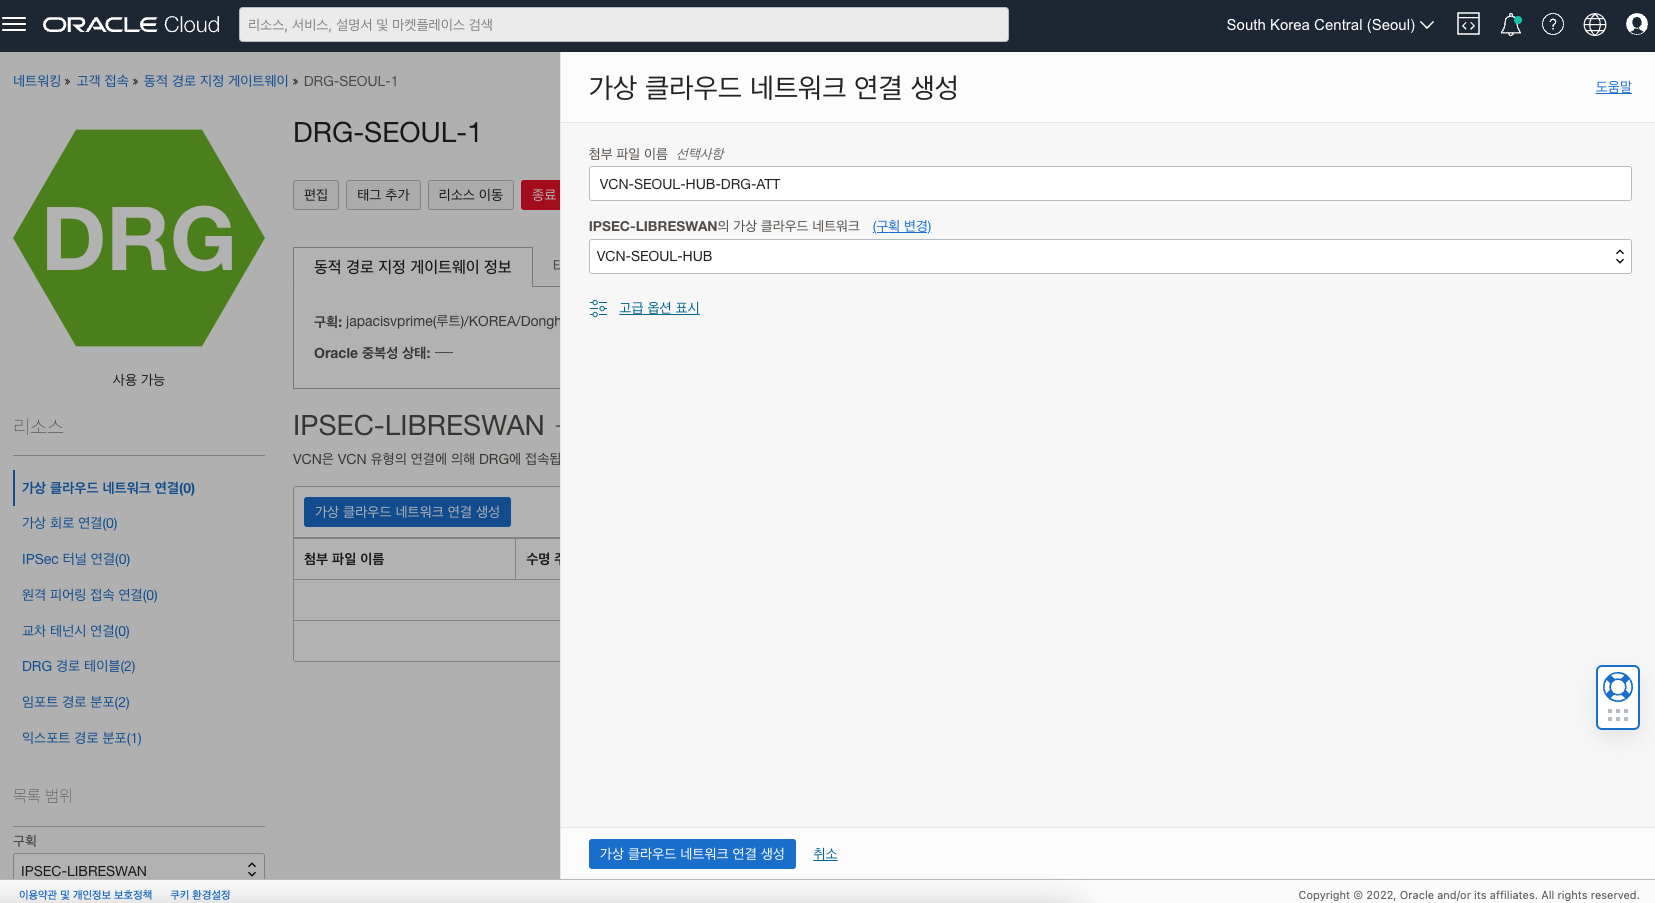
생성한 DRG를 서울 리전 VCN에 연결합니다. 가상 클라우드 네트워크 연결(Virtual Cloud Networks Attachments) 메뉴를 클릭하고 가상 클라우드 네트워크 연결 생성(Create Virtual Cloud Network Attachment) 버튼을 클릭한 후 다음과 같이 입력하여 생성합니다.
- 첨부 파일 이름(Attachment name): VCN-SEOUL-HUB-DRG-ATT
- 가상 클라우드 네트워크(Virtual Cloud Network): VCN-SEOUL-HUB
IPSec 접속 생성
IPSec 접속 생성을 위해 서울 리전에서 메뉴 > 네트워킹(Networking) > 고객 접속(Customer Connectivity)으로 이동 후 사이트 간 VPN(Site-to-Site VPN)을 선택합니다. 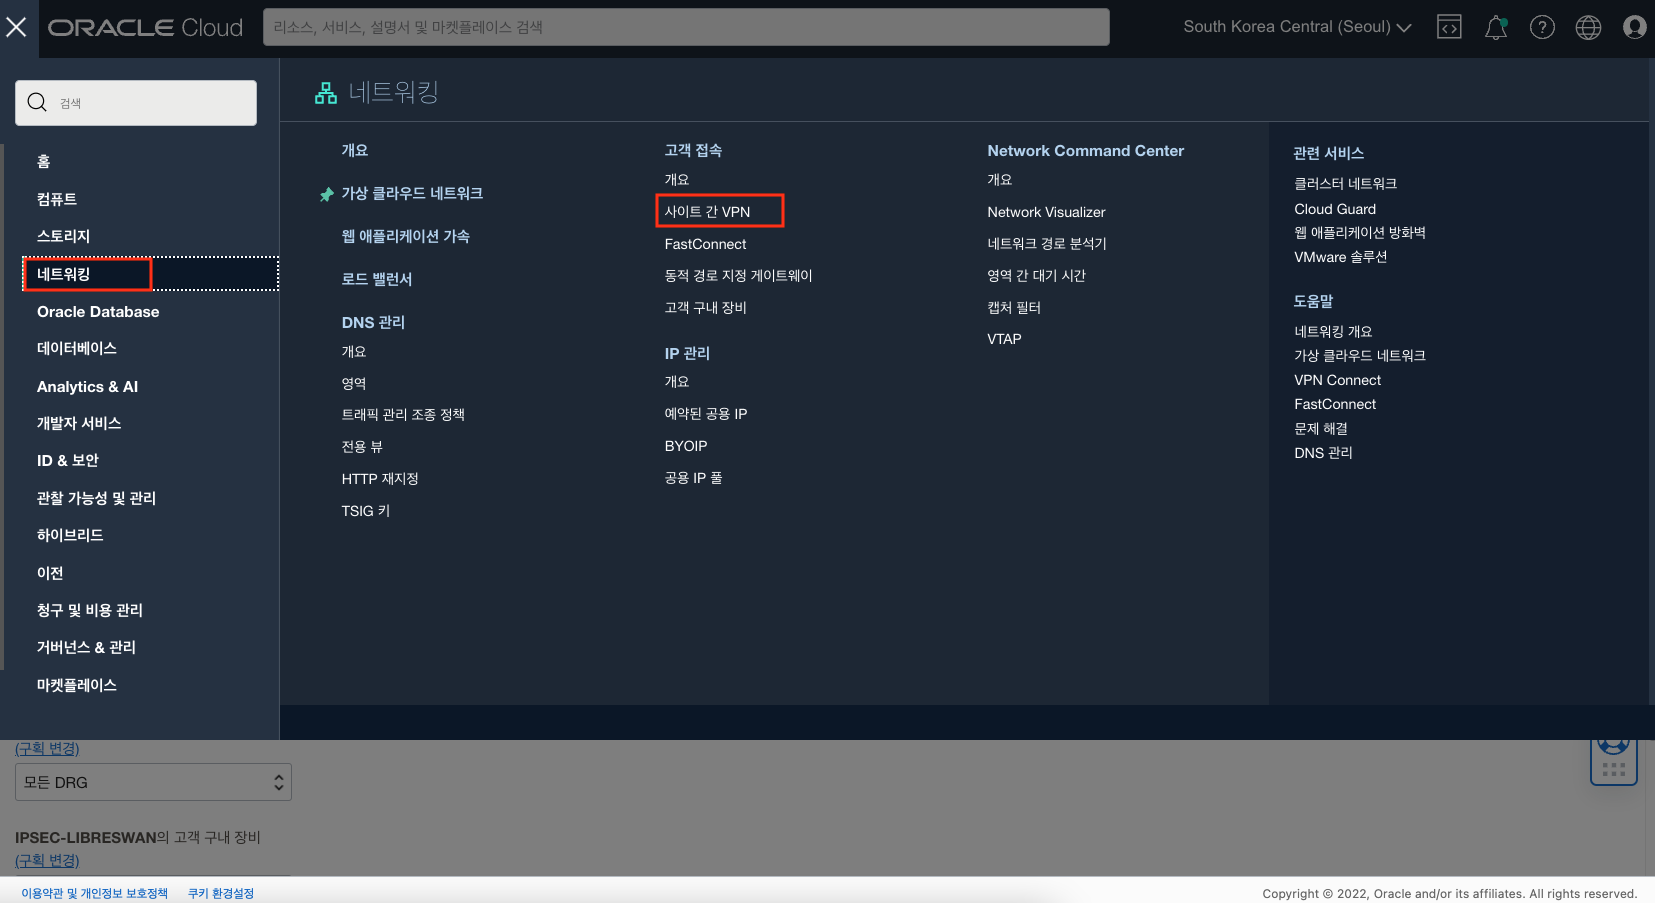
두 개의 버튼이 있는데, Security List나 Route Table 구성등을 자동으로 해주는 VPN 마법사를 사용하겠습니다. VPN 마법사 시작(Start VPN Wizard) 버튼을 클릭합니다. 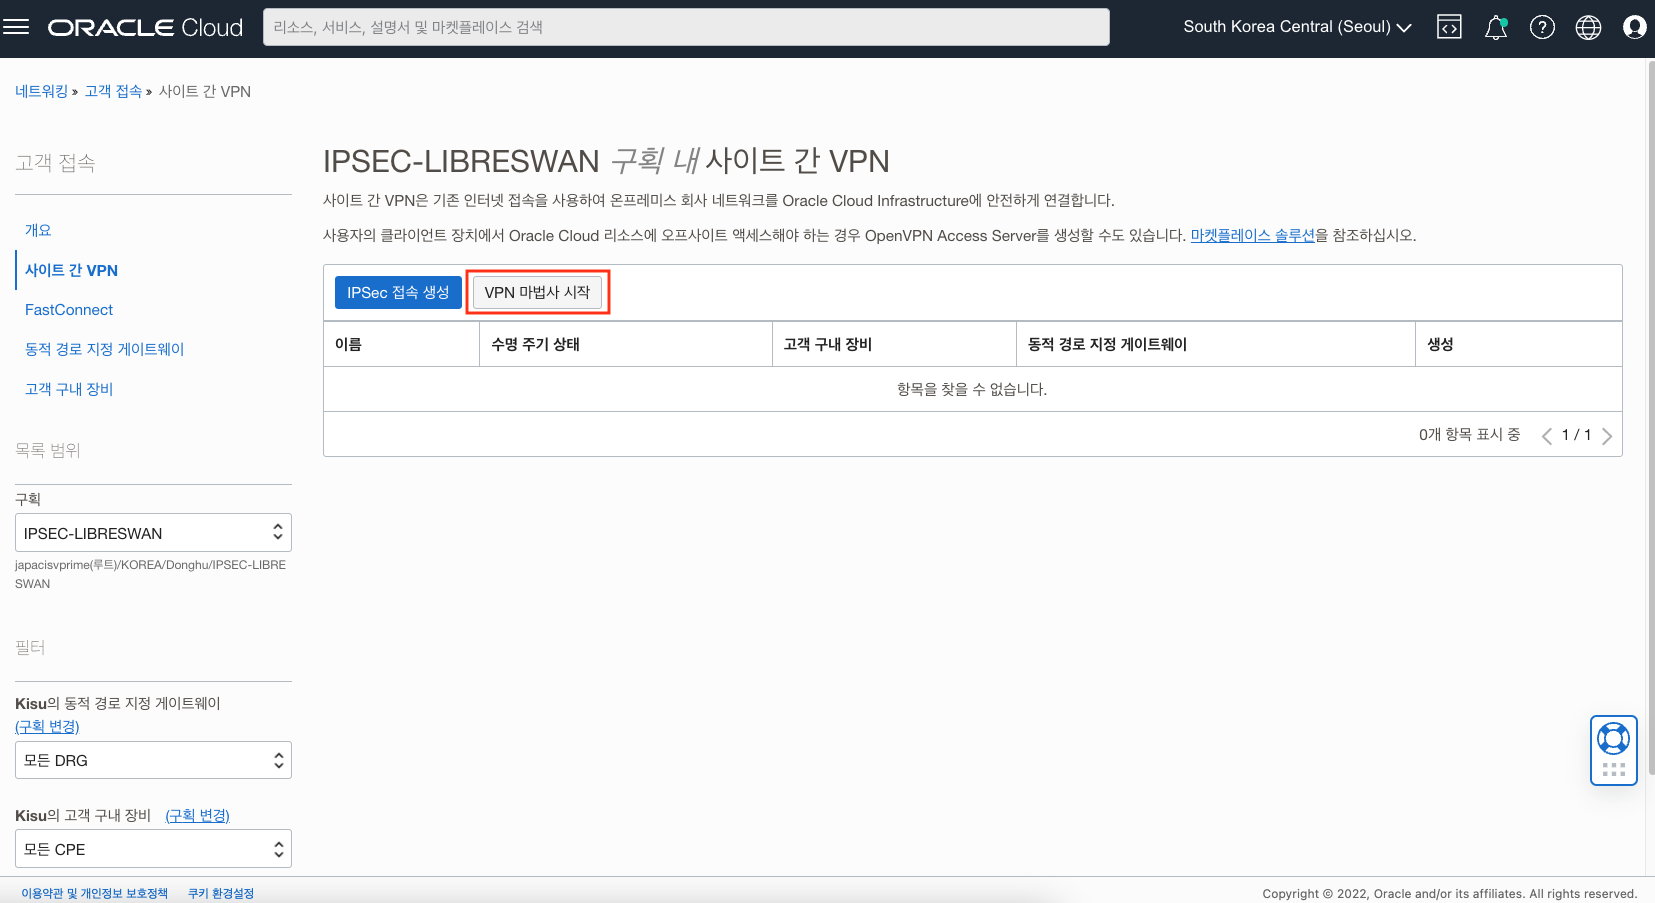
IPSec 접속 생성 - 기본 정보
기본 정보에서는 구획, 앞서 생성한 DRG, Internet Gateway를 선택합니다. 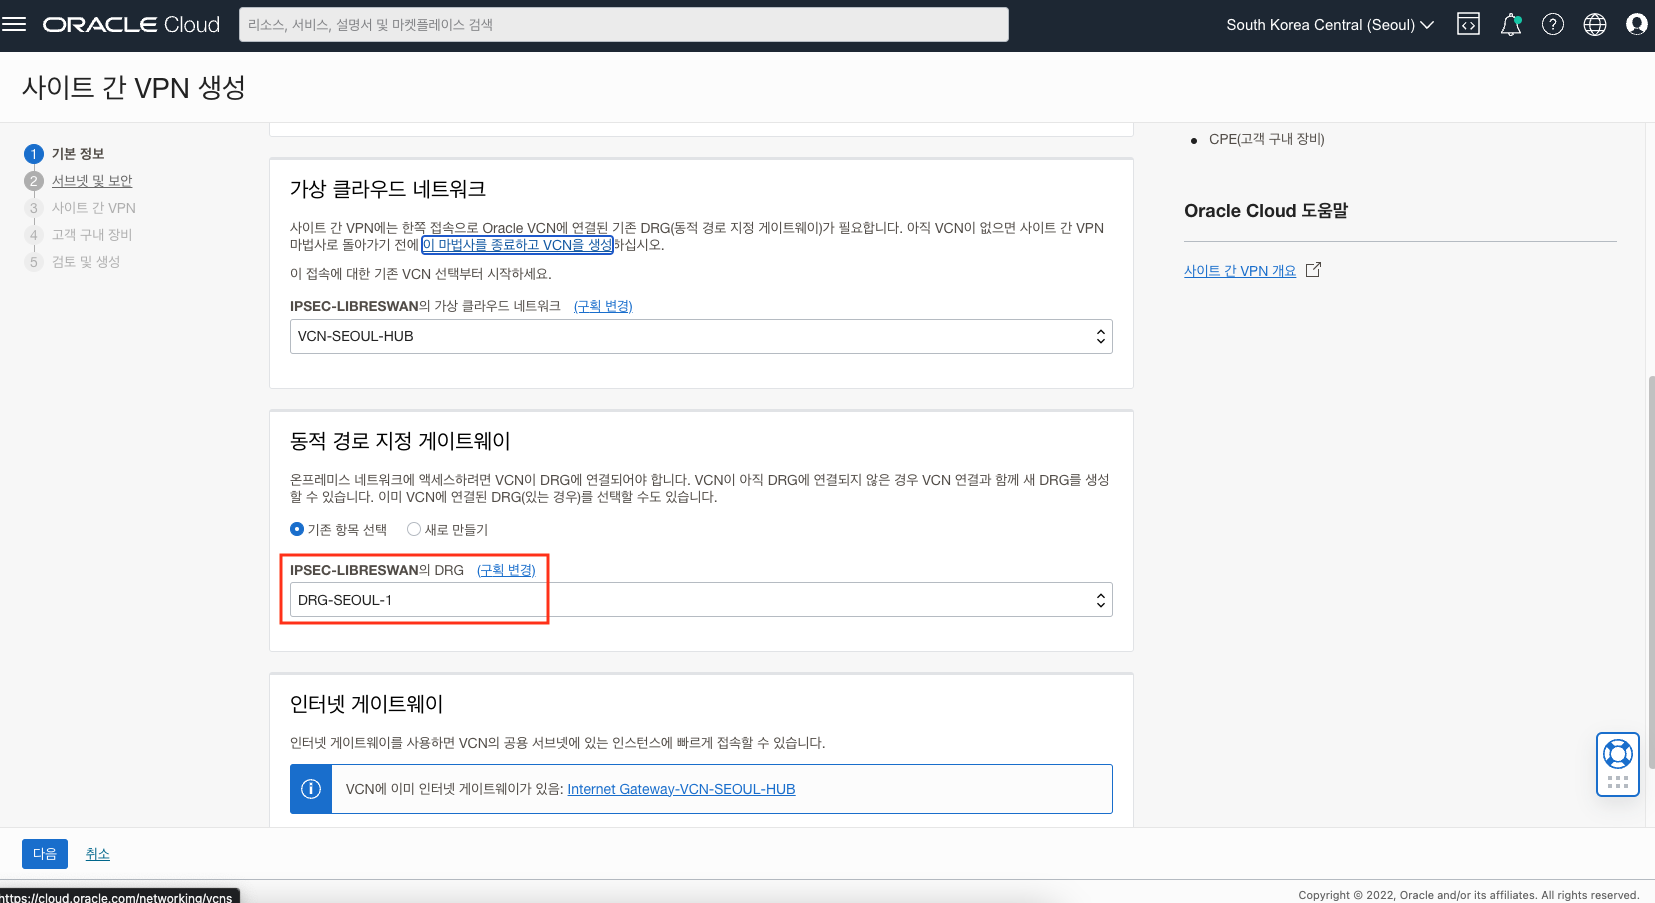
IPSec 접속 생성 - 서브넷 및 보안
서브넷 및 보안에서는 연결하기 위한 서브넷과 Security List를 선택합니다. 여기서는 테스트를 위해서 쉽게 SSH 접속을 하기 위해 Public Subnet과 연결하도록 합니다. 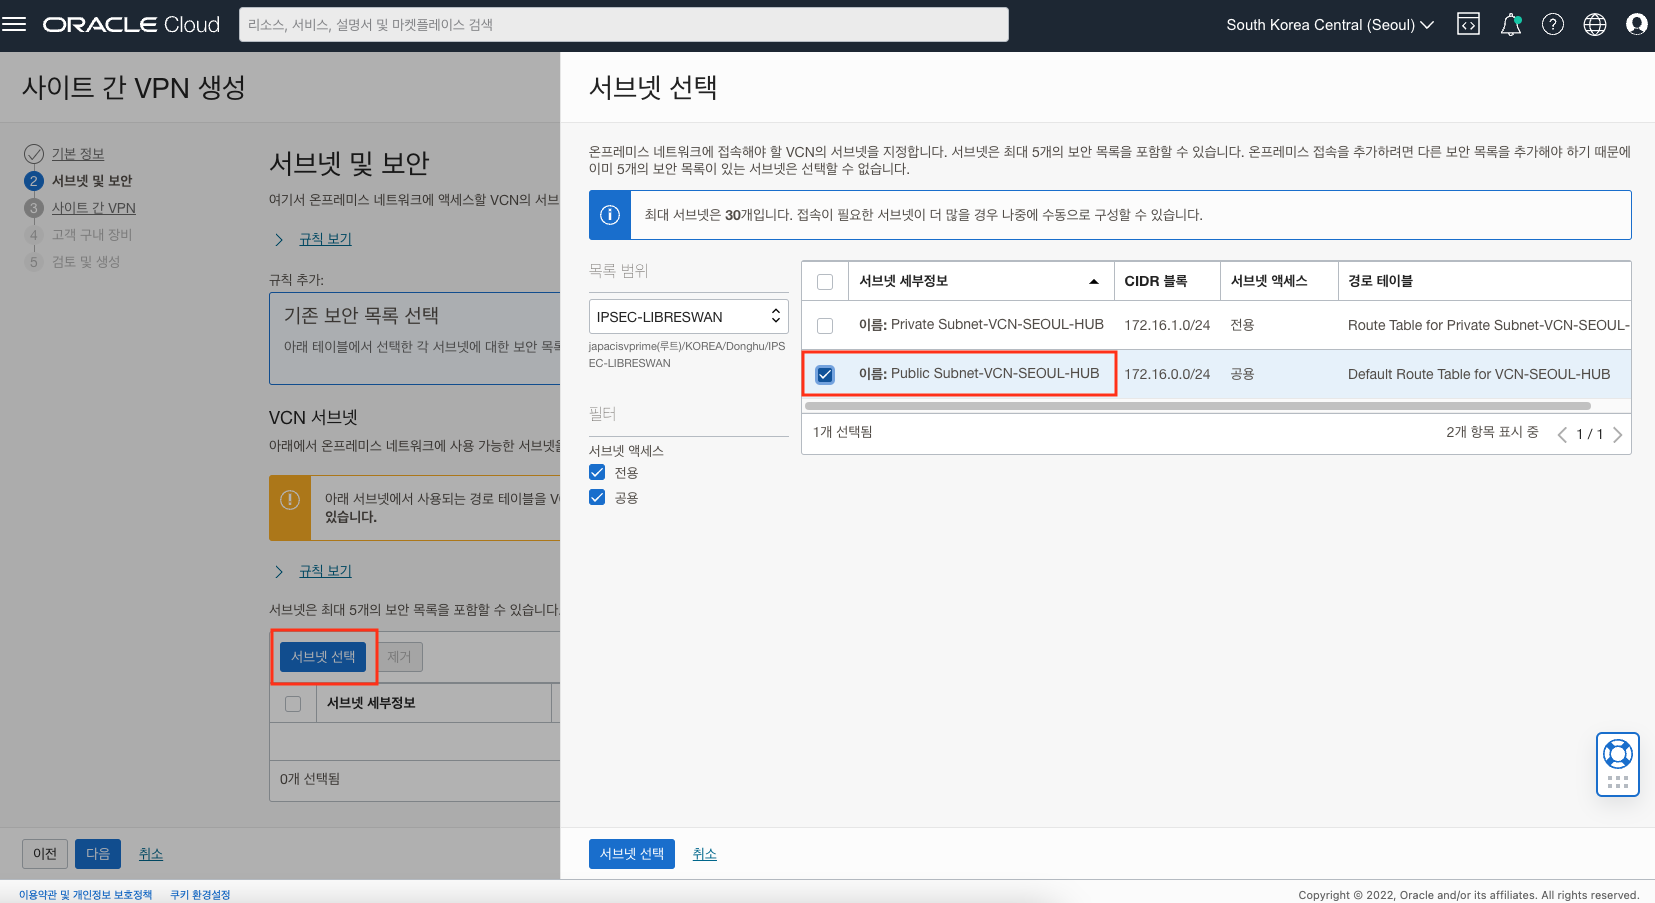
IPSec 접속 생성 - 사이트 간 VPN
사이트 간 VPN 설정에서는 다음과 같이 설정합니다.
- VPN 이름(VPN Name): IPSec-OnPremise-1-SeoulHubVCN
- 경로 지정 유형(Routing Type): BGP 동적 경로 지정
온프레미스 네트워크에 대한 경로(Routes To Your On-Premises Network): 10.0.0.0/16 (춘천 리전 VCN CIDR)
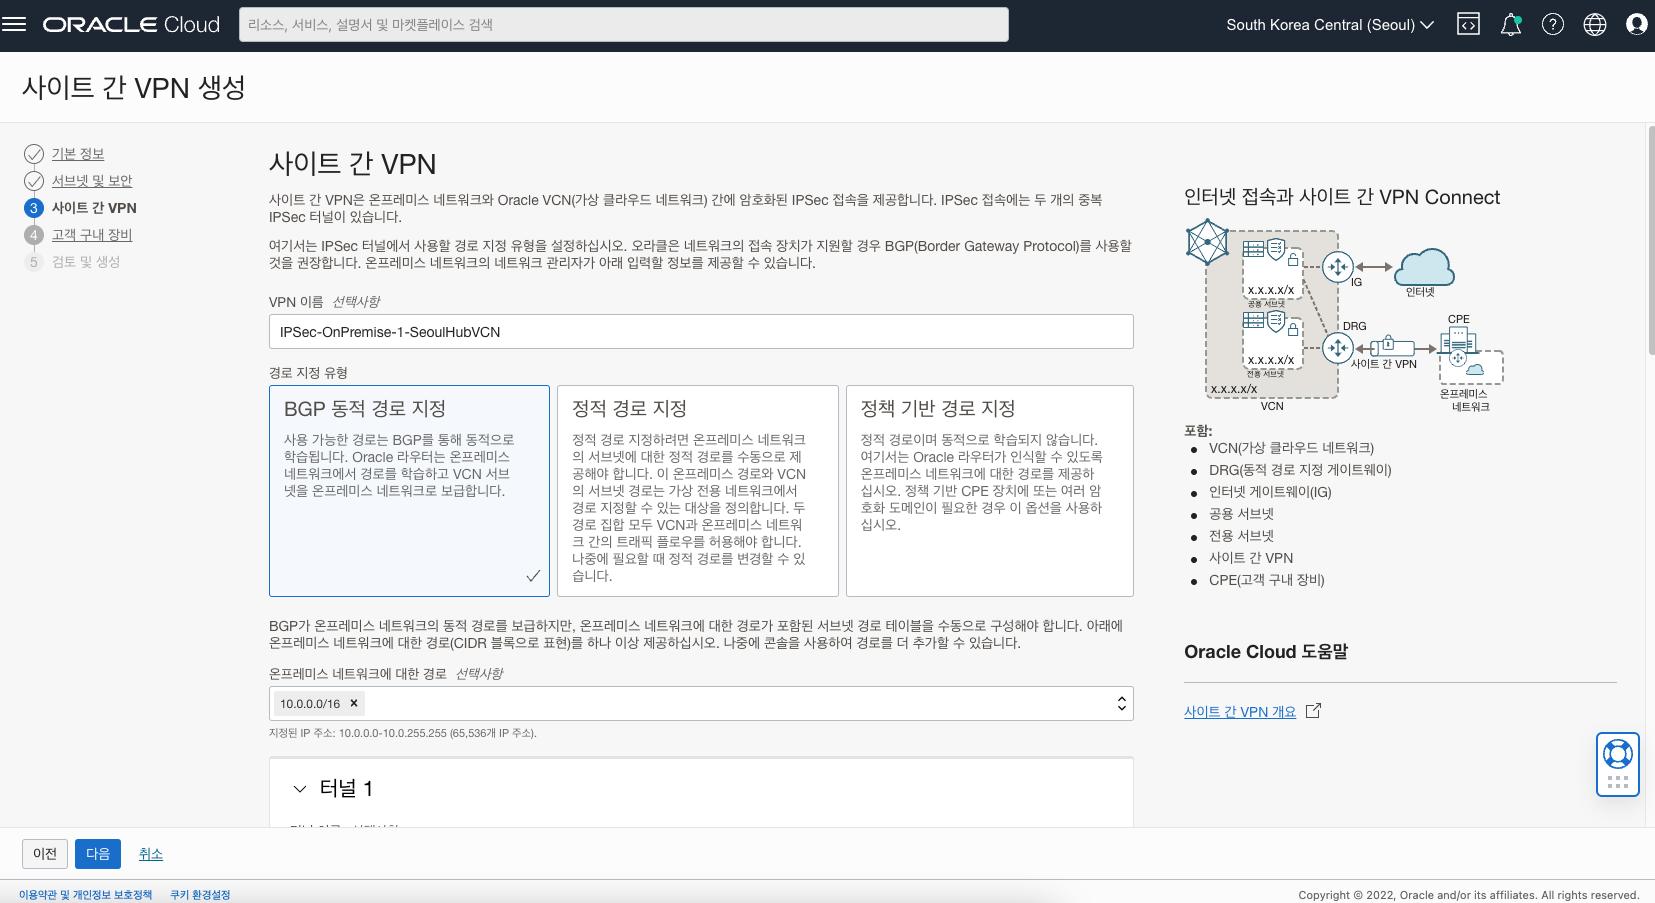
- 터널 1
- 터널 이름(Tunnel Name): Tunnel-1
- IKE 버전(IKE Version): IKEv1
- 내 BGP ASN(Your BGP ASN): 65000
- IPv4 내부 터널 인터페이스 - CPE(IPv4 Inside Tunnel Interface - CPE): 10.10.10.1/30
- IPv4 내부 터널 인터페이스 - Oracle(IPv4 Inside Tunnel Interface - Oracle): 10.10.10.2/30
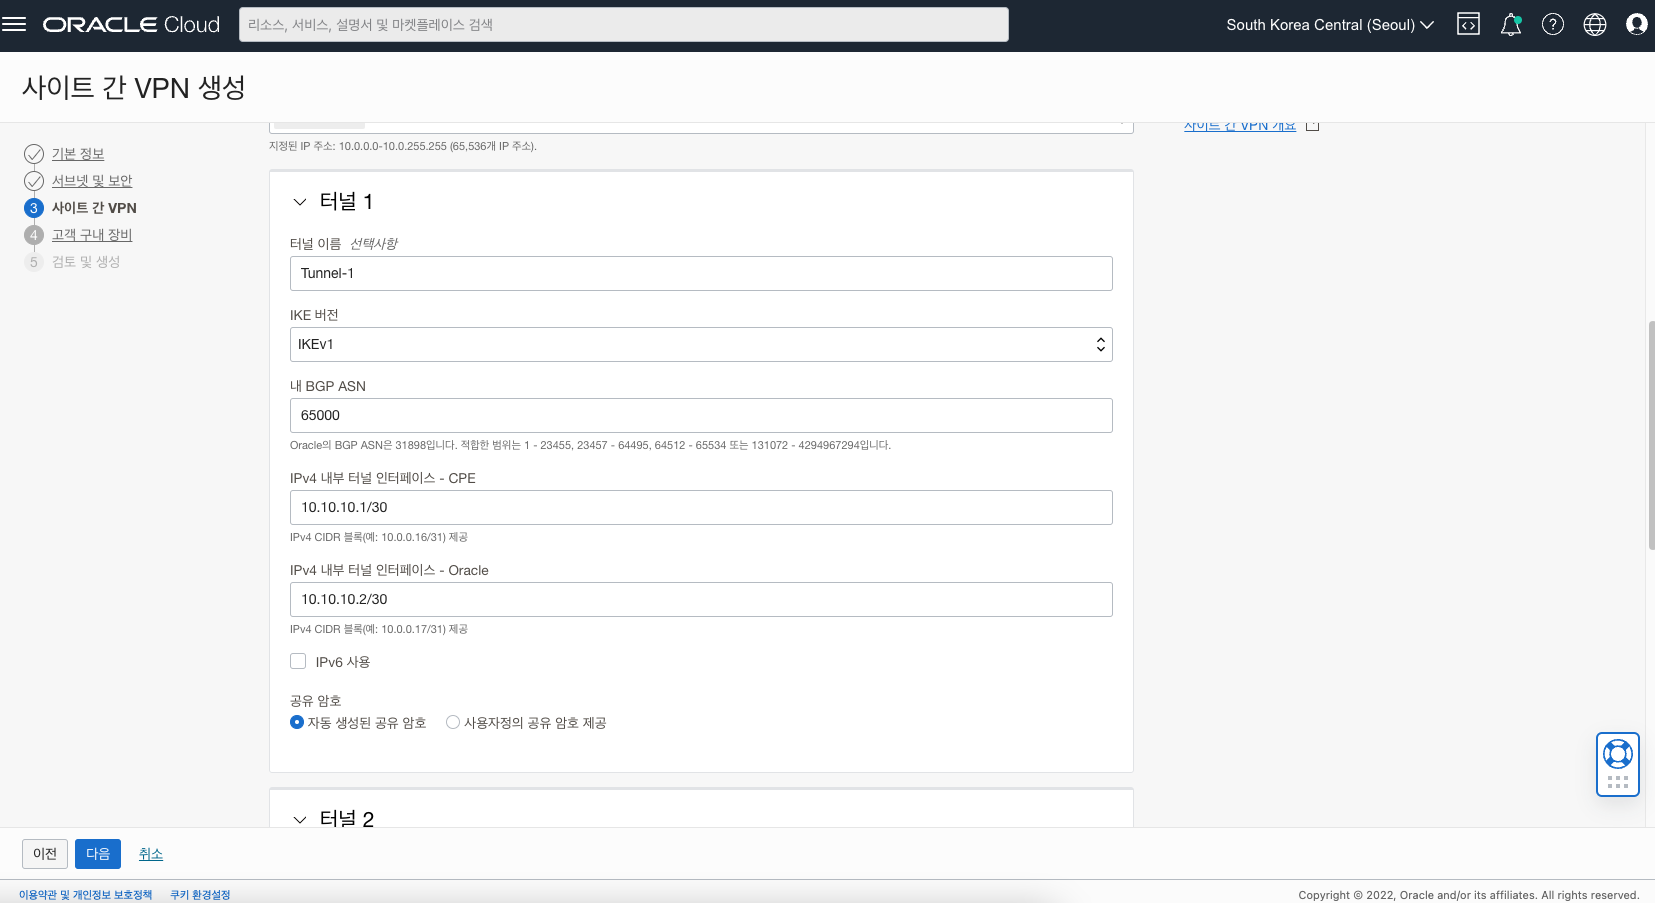
- 터널 2
- 터널 이름(Tunnel Name): Tunnel-2
- IKE 버전(IKE Version): IKEv1
- 내 BGP ASN(Your BGP ASN): 65000
- IPv4 내부 터널 인터페이스 - CPE(IPv4 Inside Tunnel Interface - CPE): 10.10.10.5/30
- IPv4 내부 터널 인터페이스 - Oracle(IPv4 Inside Tunnel Interface - Oracle): 10.10.10.6/30
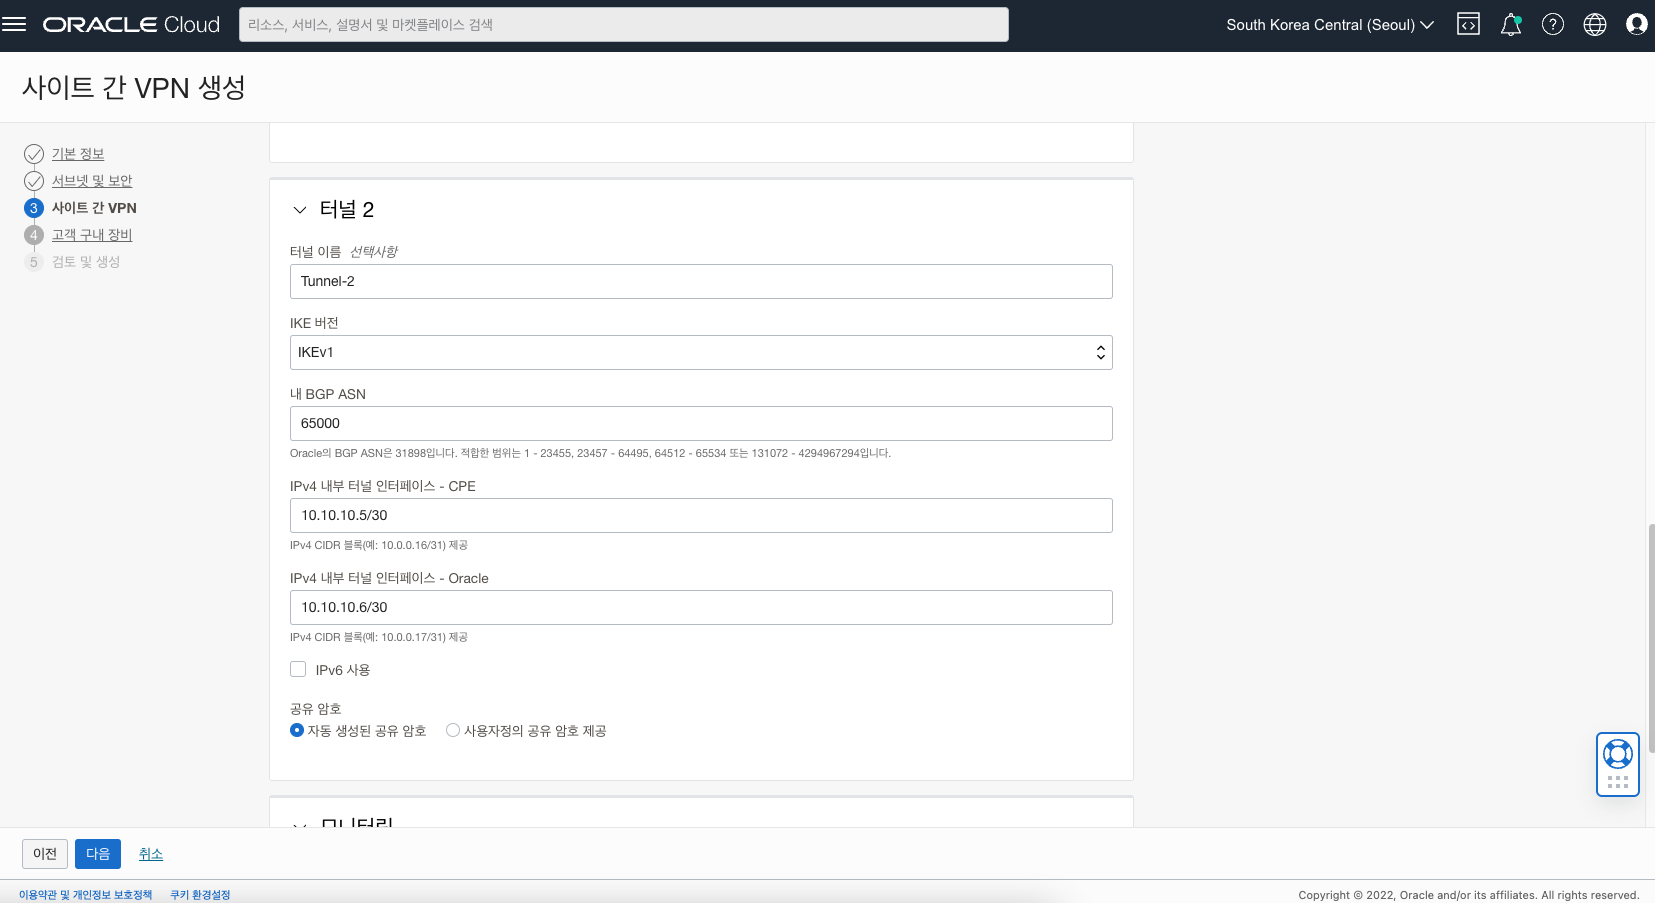
IPSec 접속 생성 - 고객 구내 장비(CPE)
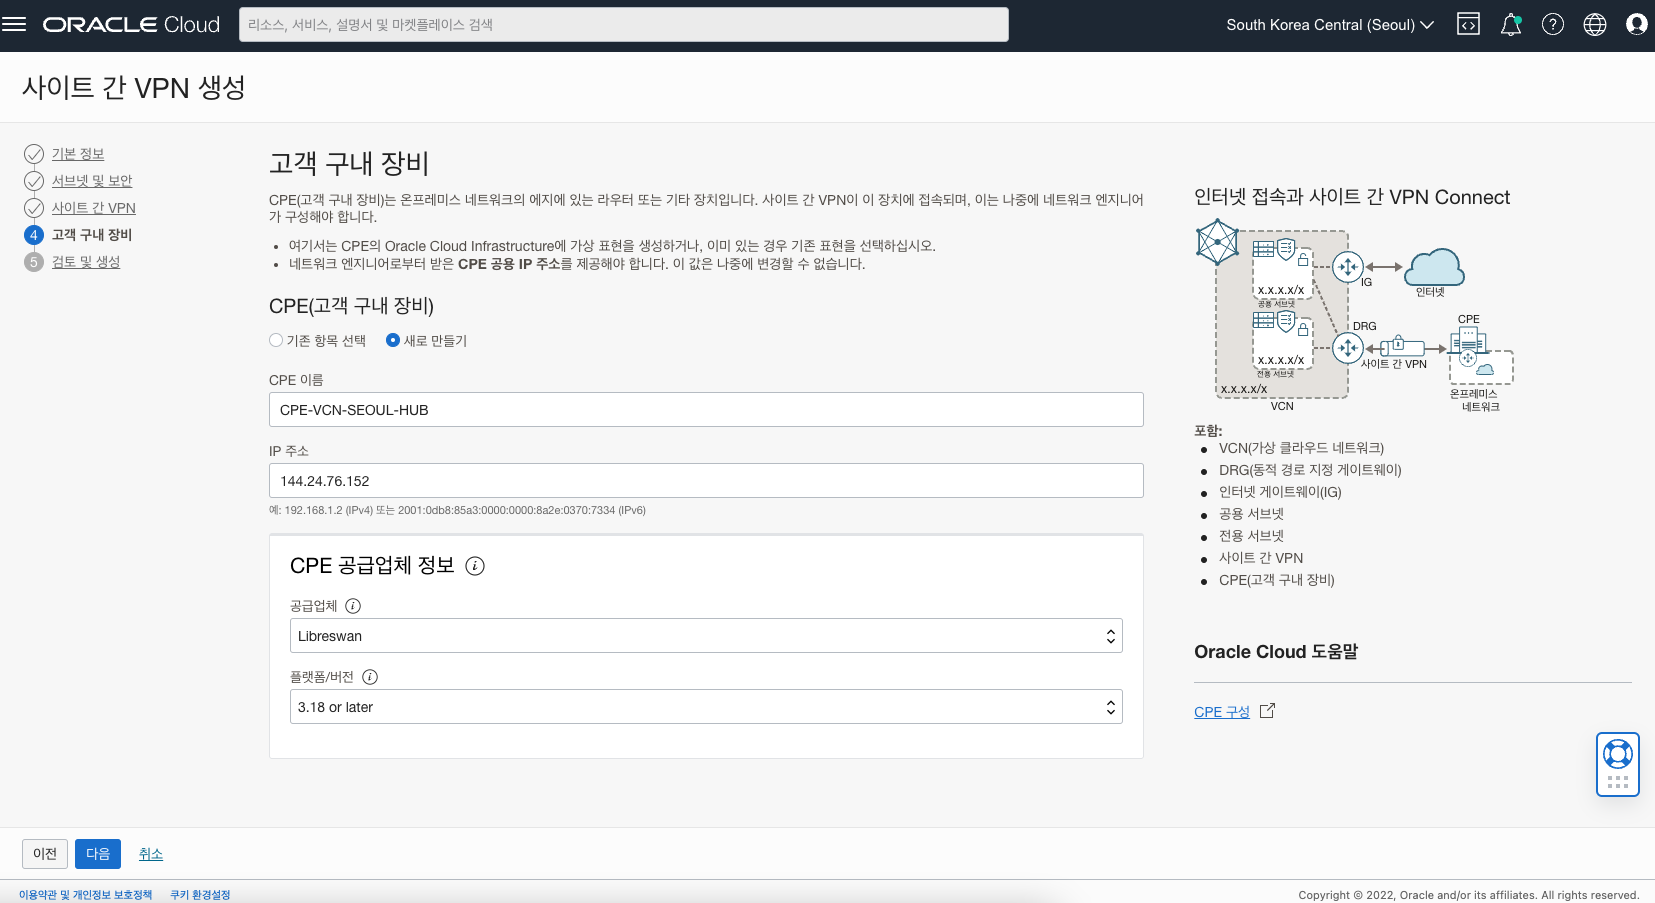
마지막으로 CPE(Customer Premises Equipment)를 생성합니다. CPE는 온프레미스 네트워크 엣지에 있는 라우터로 Site-to-Site VPN이 접속하기 위한 장비입니다. 여기서는 Libreswan이 CPE역할을 하므로 Libreswan이 설치된 인스턴스로 등록합니다.
- CPE 이름(Name): CPE-OnPremise-Libreswan
- IP 주소(IP Address): 144.24.84.145 (Libreswan이 설치되는 인스턴스의 Public IP)
- CPE 공급업체 정보(CPE Vendor Information)
- 공급업체(Vendor): Libreswan
- Platform/Version: 3.18 or later
마지막으로 설정한 내용을 최종 검토하고 VPN 솔루션 생성(Create VPN Solution) 버튼을 클릭하여 IPSec Connection을 생성합니다. 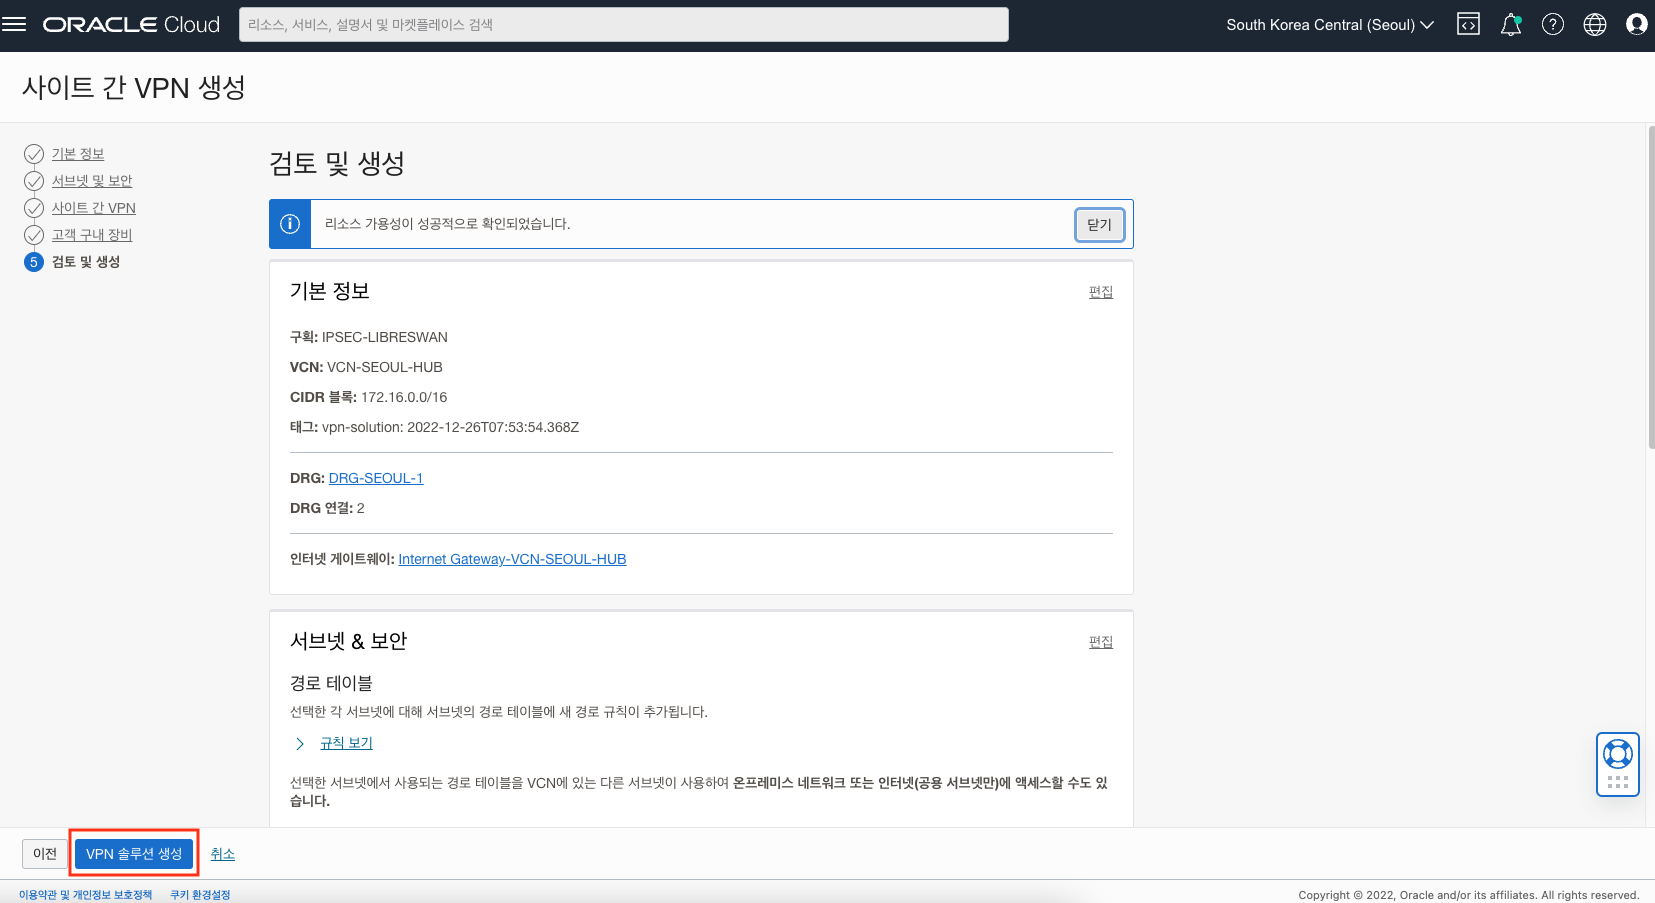
IPSec 접속 생성 - 상세
생성된 IPSec 접속 상세화면을 다음과 같이 볼 수 있습니다. 이제 IPSec 상태와 IPv4 BGP 상태가 모두 작동(Up) 상태가 되어야 합니다. 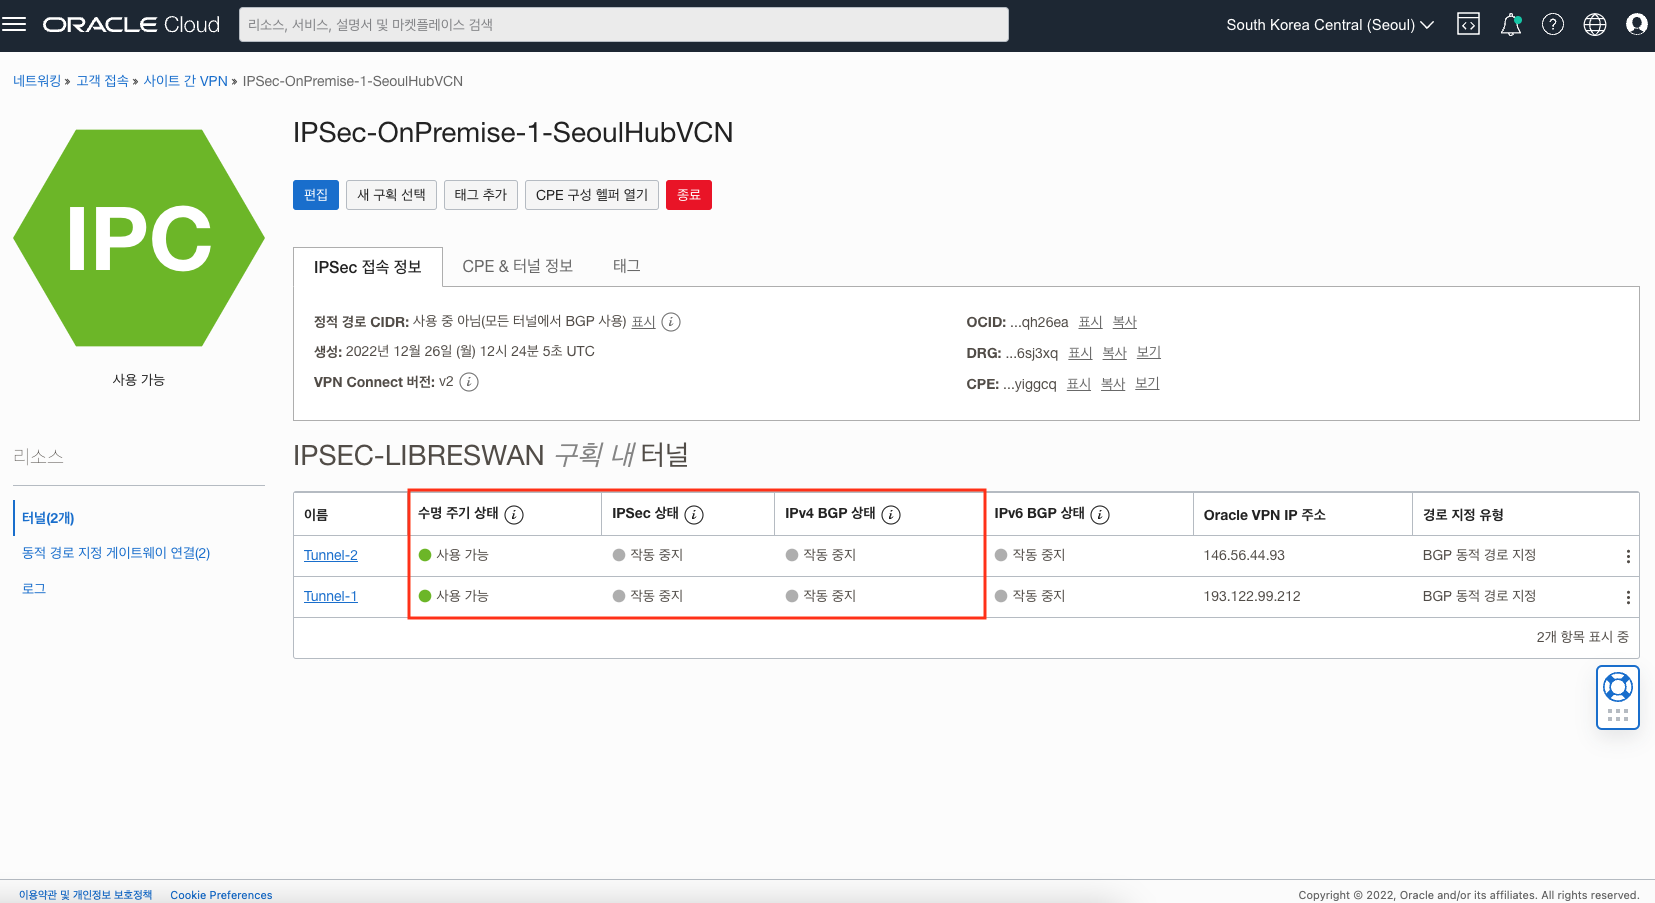
우선 CPE 구성 헬퍼 열기(Open CPE Configuration Helper)를 클릭하면 CPE를 구성하기 위한 Helper를 볼 수 있습니다. **콘텐츠 생성(Create Content)를 클릭한 후 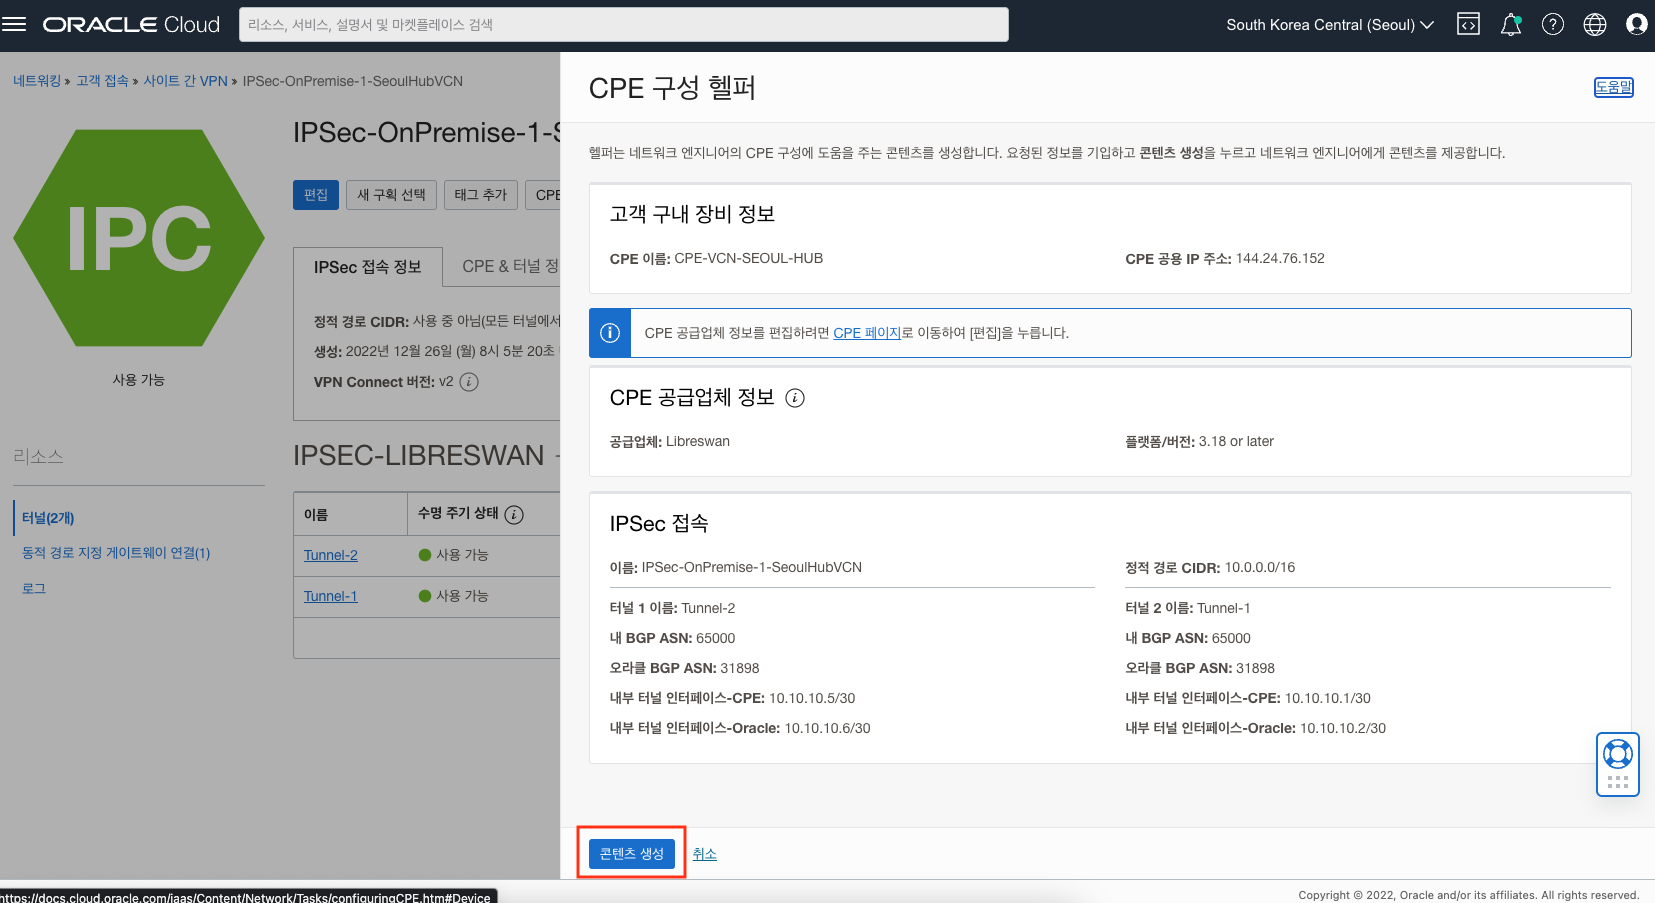
클립보드로 구성 복사(Copy Configuration To Clipboard) 혹은 구성 다운로드(Download Configuration)를 클릭하여 CPE 구성 정보를 저장합니다. 추후 이 정보를 참고하여 CPE를 구성합니다. 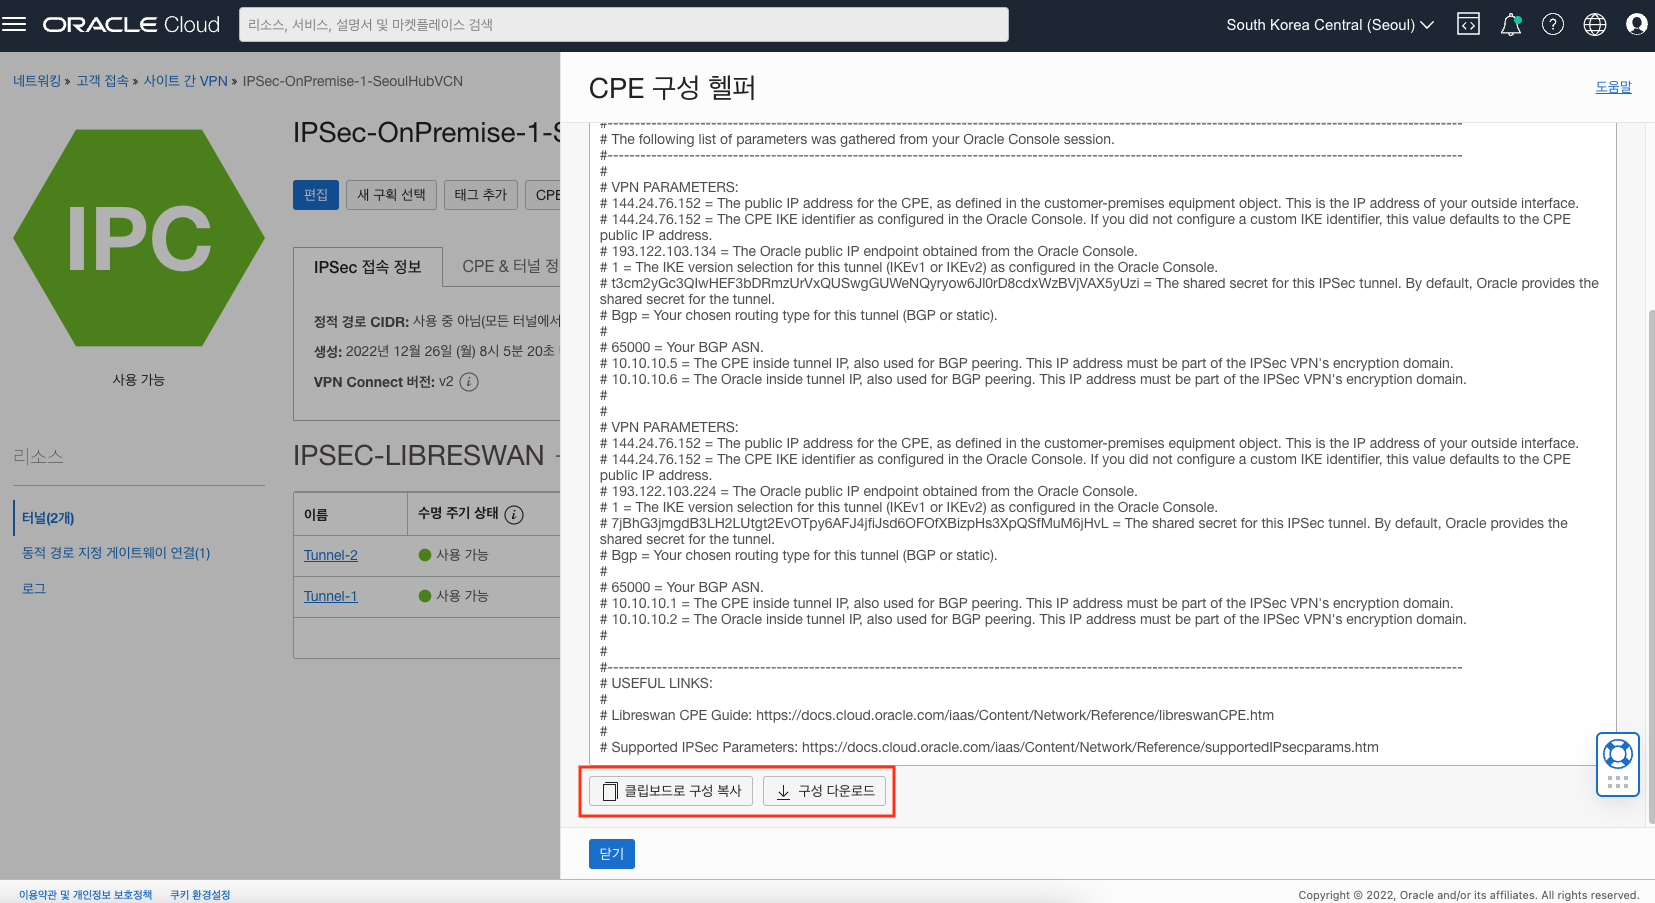
CPE 구성 (Libreswan 설치 및 구성)
CPE 구성을 위해 Libreswan을 설치하도록 합니다. 앞서 Libreswan을 위해 생성한 인스턴스로 접속합니다.
$ ssh -i {ssh key} opc@144.24.84.145
root로 변경합니다.
$ sudo su -
이제 클라이언트가 Libreswan을 통해 트래픽을 보내고 받을 수 있도록 네트워크 인터페이스에서 IP forwarding을 활성화해야 합니다. 먼저 인터페이스 이름을 확인합니다.
[root@onpremise-cpe-libreswan ~]# ifconfig
ens3: flags=4163<UP,BROADCAST,RUNNING,MULTICAST>  mtu 9000
        inet 10.0.236.153  netmask 255.255.0.0  broadcast 10.0.255.255
        inet6 fe80::17ff:fe00:4885  prefixlen 64  scopeid 0x20<link>
        ether 02:00:17:00:48:85  txqueuelen 1000  (Ethernet)
        RX packets 116024  bytes 419262758 (399.8 MiB)
        RX errors 0  dropped 0  overruns 0  frame 0
        TX packets 106189  bytes 89958361 (85.7 MiB)
        TX errors 0  dropped 0 overruns 0  carrier 0  collisions 0

lo: flags=73<UP,LOOPBACK,RUNNING>  mtu 65536
        inet 127.0.0.1  netmask 255.0.0.0
        inet6 ::1  prefixlen 128  scopeid 0x10<host>
        loop  txqueuelen 1000  (Local Loopback)
        RX packets 13348  bytes 745742 (728.2 KiB)
        RX errors 0  dropped 0  overruns 0  frame 0
        TX packets 13348  bytes 745742 (728.2 KiB)
        TX errors 0  dropped 0 overruns 0  carrier 0  collisions 0
인터페이스 이름은 ens3 입니다. 다음과 같이 sysctl.conf 파일을 오픈하여 다음과 같이 내용을 추가합니다.
$ vi /etc/sysctl.conf

Kernel.unknown_nmi_panic = 1
net.ipv4.ip_forward = 1
net.ipv4.conf.all.accept_redirects = 0
net.ipv4.conf.all.send_redirects = 0
net.ipv4.conf.default.send_redirects = 0
net.ipv4.conf.ens3.send_redirects = 0
net.ipv4.conf.default.accept_redirects = 0
net.ipv4.conf.ens3.accept_redirects = 0
적용을 위해 다음 명령어를 실행합니다.
[root@onpremise-cpe-libreswan ~]# sysctl -p
net.ipv4.ip_forward = 1
net.ipv4.conf.all.accept_redirects = 0
net.ipv4.conf.all.send_redirects = 0
net.ipv4.conf.default.send_redirects = 0
net.ipv4.conf.ens3.send_redirects = 0
net.ipv4.conf.default.accept_redirects = 0
net.ipv4.conf.ens3.accept_redirects = 0
CPE(Libreswan)와 통신을 위해서는 OS에서 udp 500, udp 4500 포트를 오픈해야 합니다. 다음 명령어로 포트를 오픈합니다.
$ firewall-cmd --add-port=500/udp
$ firewall-cmd --add-port=4500/udp
$ firewall-cmd --runtime-to-permanent
CPE(Libreswan)가 위치한 Subnet의 Security List의 Ingress Rule도 다음과 같이 추가해줍니다. 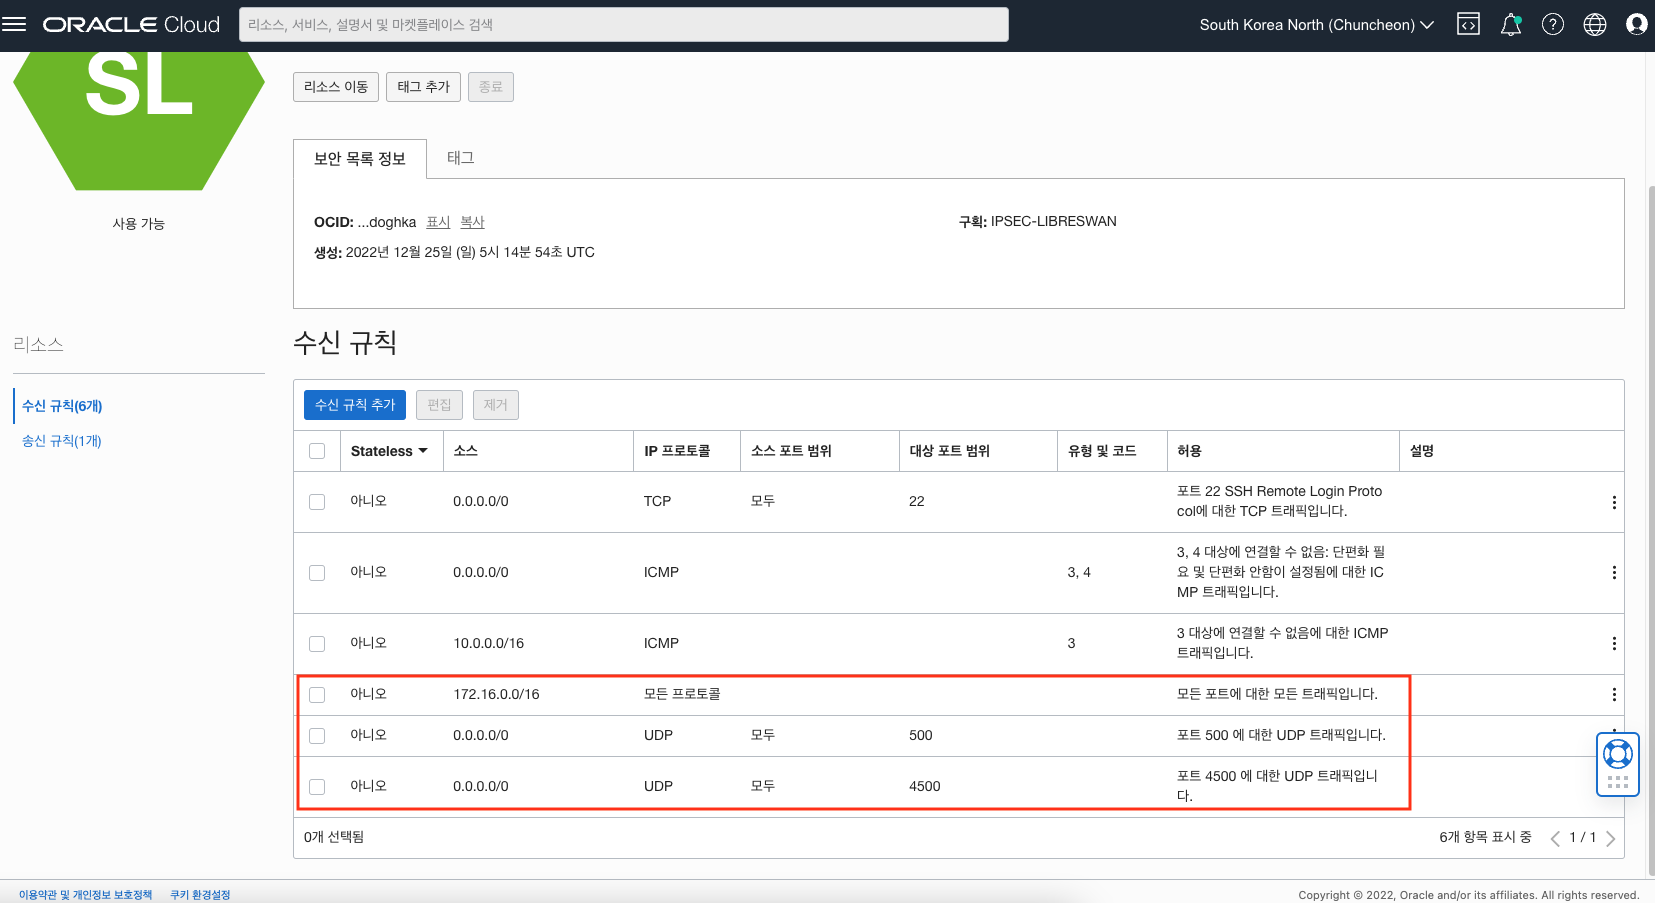
Libreswan을 설치합니다. Libreswan은 다음 명령어로 설치합니다.
$ yum install libreswan -y
Libreswan이 설치되면, 이전에 다운로드한 CPE 구성 정보를 토대로 ipsec 구성파일을 생성해야 합니다. 다음과 같이 파일을 생성하여 오픈합니다.
$ vi /etc/ipsec.d/oci-ipsec.conf
다음과 같이 입력합니다. left는 CPE 정보입니다. left는 CPE(Libreswan)의 Private IP이고, leftid는 CPE(Libreswan)의 Public IP입니다. right는 Oracle VPN IP 주소로, CPE 구성 정보 혹은 앞서 생성한 IPSec Connection 정보에서 확인할 수 있습니다. Tunnle-1과 Tunnel-2의 Oracle VPN IP를 정확히 확인하여 입력합니다.
conn Tunnel-1
     left=10.0.236.153
     # leftid=${cpePublicIpAddress} # See preceding note about 1-1 NAT device
     leftid=144.24.84.145
     right=193.122.99.212
     authby=secret
     leftsubnet=0.0.0.0/0
     rightsubnet=0.0.0.0/0
     auto=start
     mark=5/0xffffffff # Needs to be unique across all tunnels
     vti-interface=vti1
     vti-routing=no
     leftvti=10.10.10.1/30
     ikev2=no # To use IKEv2, change to ikev2=insist
     ike=aes_cbc256-sha2_384;modp1536
     phase2alg=aes_gcm256;modp1536
     encapsulation=yes
     ikelifetime=28800s
     salifetime=3600s
conn Tunnel-2
     left=10.0.236.153
     # leftid=${cpePublicIpAddress} # See preceding note about 1-1 NAT device
     leftid=144.24.84.145
     right=146.56.44.93
     authby=secret
     leftsubnet=0.0.0.0/0
     rightsubnet=0.0.0.0/0
     auto=start
     mark=6/0xffffffff # Needs to be unique across all tunnels
     vti-interface=vti2
     vti-routing=no
     leftvti=10.10.10.5/30
     ikev2=no # To use IKEv2, change to ikev2=insist
     ike=aes_cbc256-sha2_384;modp1536
     phase2alg=aes_gcm256;modp1536
     encapsulation=yes
     ikelifetime=28800s
     salifetime=3600s
ipsec을 위한 secret을 생성하여 오픈합니다.
$ vi /etc/ipsec.d/oci-ipsec.secret
다음과 같은 형식으로 입력합니다. 앞의 IP는 CPE(Libreswan)의 Public IP, 뒤의 IP는 Oracle VPN IP, PSK 이후는 공유 암호(Shared Secret)로 CPE 구성 정보 혹은 앞서 생성한 IPSec Connection 정보에서 확인할 수 있습니다
144.24.84.145 193.122.99.212: PSK "7jBhG3jmgdB3LH2LUtgt2EvOTpy6AFJ4jfiJsd6OFOfXBizpHs3XpQSfMuM6jHvL"
144.24.84.145 146.56.44.93: PSK "t3cm2yGc3QIwHEF3bDRmzUrVxQUSwgGUWeNQyryow6Jl0rD8cdxWzBVjVAX5yUzi"
다음 명령어로 ipsec 서비스를 시작합니다.
$ systemctl start ipsec
ipsec status와 ipsec verify로 상태를 확인합니다.
[root@onpremise-cpe-libreswan ~]# ipsec verify
Verifying installed system and configuration files

Version check and ipsec on-path                   	[OK]
Libreswan 4.5 (XFRM) on 5.4.17-2136.314.6.2.el8uek.x86_64
Checking for IPsec support in kernel              	[OK]
 NETKEY: Testing XFRM related proc values
         ICMP default/send_redirects              	[OK]
         ICMP default/accept_redirects            	[OK]
         XFRM larval drop                         	[OK]
Pluto ipsec.conf syntax                           	[OK]
Checking rp_filter                                	[ENABLED]
 /proc/sys/net/ipv4/conf/all/rp_filter            	[ENABLED]
  rp_filter is not fully aware of IPsec and should be disabled
Checking that pluto is running                    	[OK]
 Pluto listening for IKE on udp 500               	[OK]
 Pluto listening for IKE/NAT-T on udp 4500        	[OK]
 Pluto ipsec.secret syntax                        	[OK]
Checking 'ip' command                             	[OK]
Checking 'iptables' command                       	[OK]
Checking 'prelink' command does not interfere with FIPS	[OK]
Checking for obsolete ipsec.conf options          	[OK]
IPSec 접속 상세 화면에서 각 터널의 IPSec 상태가 작동 중(Up) 상태인 것을 확인합니다. 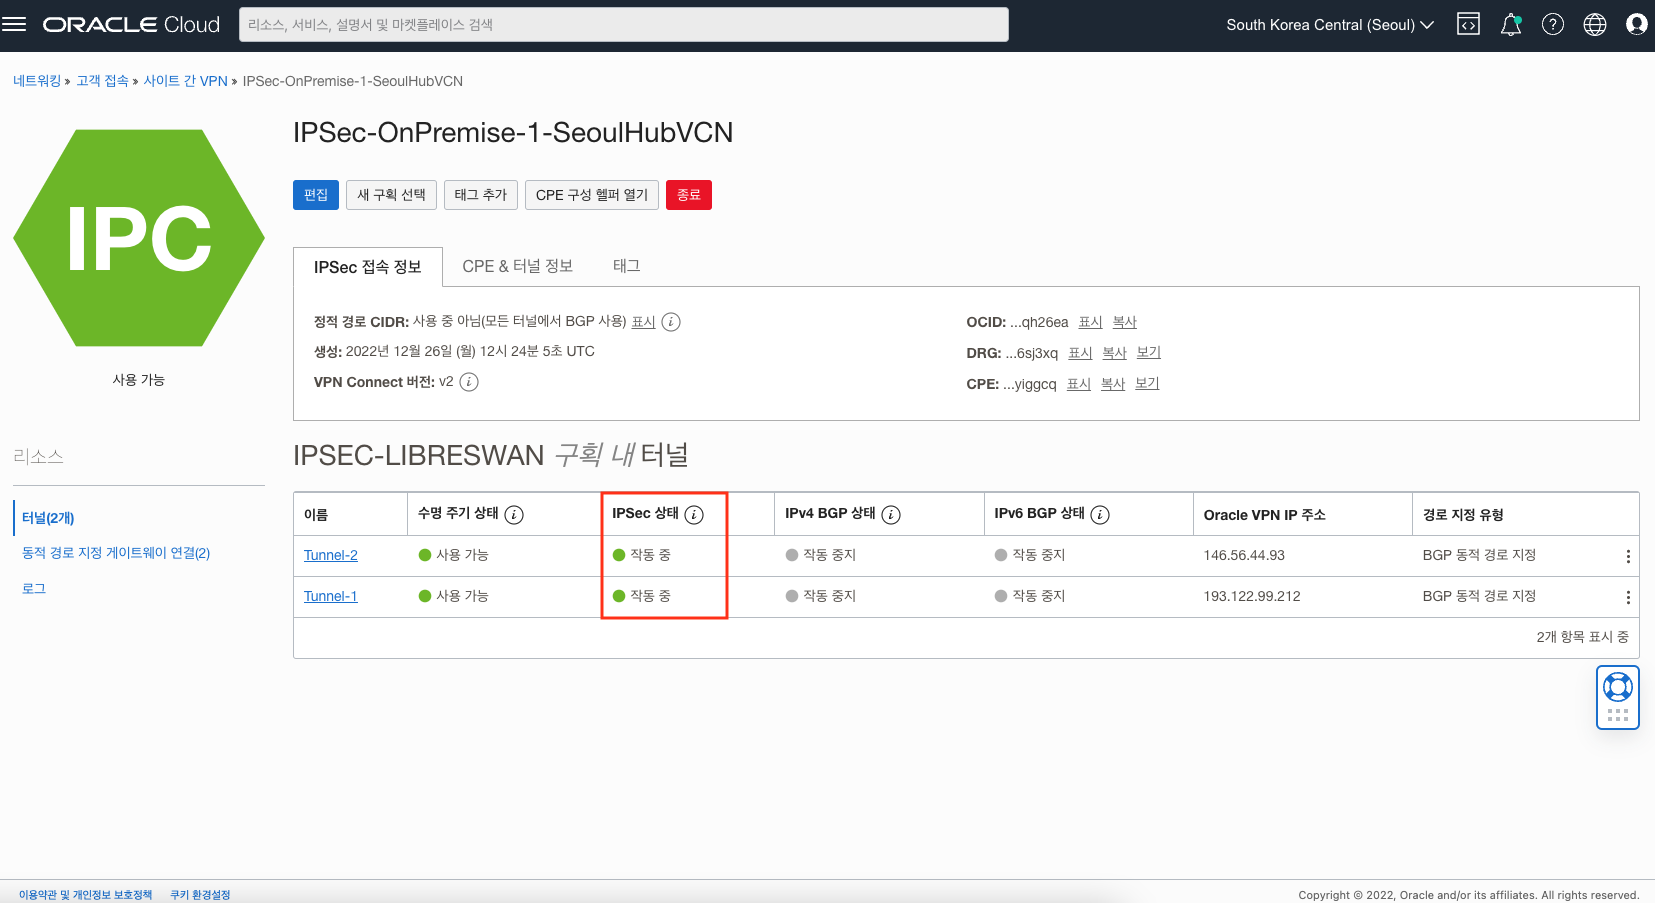
OCI쪽의 터널 인터페이스와 연결이 되었는지 확인합니다.
[root@libreswancpe ipsec.d]# ping 10.10.10.2
PING 10.10.10.2 (10.10.10.2) 56(84) bytes of data.
64 bytes from 10.10.10.2: icmp_seq=1 ttl=64 time=2.45 ms
64 bytes from 10.10.10.2: icmp_seq=2 ttl=64 time=2.48 ms
터널 인터페이스도 추가된 것을 확인할 수 있습니다.
[root@libreswancpe ipsec.d]# ifconfig
ens3: flags=4163<UP,BROADCAST,RUNNING,MULTICAST>  mtu 9000
        inet 10.0.236.153  netmask 255.255.0.0  broadcast 10.0.255.255
        inet6 fe80::17ff:fe01:e041  prefixlen 64  scopeid 0x20<link>
        ether 02:00:17:01:e0:41  txqueuelen 1000  (Ethernet)
        RX packets 54401  bytes 247528326 (236.0 MiB)
        RX errors 0  dropped 0  overruns 0  frame 0
        TX packets 44163  bytes 19875040 (18.9 MiB)
        TX errors 0  dropped 0 overruns 0  carrier 0  collisions 0

lo: flags=73<UP,LOOPBACK,RUNNING>  mtu 65536
        inet 127.0.0.1  netmask 255.0.0.0
        inet6 ::1  prefixlen 128  scopeid 0x10<host>
        loop  txqueuelen 1000  (Local Loopback)
        RX packets 3350  bytes 252387 (246.4 KiB)
        RX errors 0  dropped 0  overruns 0  frame 0
        TX packets 3350  bytes 252387 (246.4 KiB)
        TX errors 0  dropped 0 overruns 0  carrier 0  collisions 0

vti1: flags=209<UP,POINTOPOINT,RUNNING,NOARP>  mtu 8980
        inet 10.10.10.1  netmask 255.255.255.252  destination 10.10.10.1
        inet6 fe80::5efe:a00:ec99  prefixlen 64  scopeid 0x20<link>
        tunnel   txqueuelen 1000  (IPIP Tunnel)
        RX packets 4794  bytes 300855 (293.8 KiB)
        RX errors 0  dropped 0  overruns 0  frame 0
        TX packets 4800  bytes 301144 (294.0 KiB)
        TX errors 387  dropped 0 overruns 0  carrier 387  collisions 0

vti2: flags=209<UP,POINTOPOINT,RUNNING,NOARP>  mtu 8980
        inet 10.10.10.5  netmask 255.255.255.252  destination 10.10.10.5
        inet6 fe80::5efe:a00:ec99  prefixlen 64  scopeid 0x20<link>
        tunnel   txqueuelen 1000  (IPIP Tunnel)
        RX packets 5411  bytes 332939 (325.1 KiB)
        RX errors 0  dropped 0  overruns 0  frame 0
        TX packets 4782  bytes 300208 (293.1 KiB)
        TX errors 387  dropped 0 overruns 0  carrier 387  collisions 0
BGP 구성
BGP(Boarder Gateway Protocol)은 다른 AS(Autonomous System) 사이의 경로 지정(라우팅)을 위해 사용되는 프로토콜입니다. BGP에 대한 자세한 설명은 아래 링크를 참고하세요.
이제 BGP를 실행하기 위해 FRRouting(FRR)을 인스톨합니다. FRR은 Linux 및 Unix 플랫폼용 IP 라우팅 프로토콜 오픈소스 솔루션으로 BGP, RIP, OSPF, IS-IS등과 같은 모든 표준 라우팅 프로토콜을 확장하여 구현하고 있습니다. FRR에 대한 내용은 아래 링크 참고합니다.
다음 명령어로 FRR을 설치합니다.
$ yum install frr -y
FRR을 설치한 후 bgpd.conf라는 파일을 생성해야 합니다.
$ vi /etc/frr/bgpd.conf
다음 내용을 bgpd.conf에 추가합니다.
hostname libreswancpe
log file //bgpd.log
log stdout
router bgp 65000
 bgp router-id 10.10.10.1
 timers bgp 6 18
 neighbor 10.10.10.2 remote-as 31898
 neighbor 10.10.10.2 ebgp-multihop 255
 neighbor 10.10.10.2 timers 6 18
 neighbor 10.10.10.6 remote-as 31898
 neighbor 10.10.10.6 ebgp-multihop 255
 neighbor 10.10.10.6 timers 6 18
 address-family ipv4 unicast
  network 10.0.0.0/16
  neighbor 10.10.10.2 next-hop-self
  neighbor 10.10.10.2 soft-reconfiguration inbound
  neighbor 10.10.10.2 route-map ALLOW-ALL in
  neighbor 10.10.10.2 route-map BGP-ADVERTISE-OUT out
  neighbor 10.10.10.6 next-hop-self
  neighbor 10.10.10.6 soft-reconfiguration inbound
  neighbor 10.10.10.6 route-map ALLOW-ALL in
  neighbor 10.10.10.6 route-map BGP-ADVERTISE-OUT out
 exit-address-family
위 내용에서 아래 부분은 온프레미스 서브넷(춘천 리전)을 모든 neighbor에 알리기 위한 부분으로, 온프레미스 CIDR를 입력합니다.
 address-family ipv4 unicast
  network 10.0.0.0/16
여기까지 작성하면 온프레미스와 OCI간의 BGP 세션이 설정됩니다. 추가로 피어간 접두사를 주고받는 설정이 필요한데, 이를 위해 온프레미스 서브넷을 허용하는 접두사 목록(prefix-list)을 생성하고, 해당 Prefix-list(BGP-OUT)가 Route-Map BGP-ADVERTISE-OUT에서 참조되도록 다음 내용을 추가합니다. 또한 모든 경로를 허용하기 위해 route-map ALLOW-ALL도 추가하였습니다.
ip prefix-list BGP-OUT seq 10 permit 10.0.0.0/16
route-map BGP-ADVERTISE-OUT permit 10
 match ip address prefix-list BGP-OUT
route-map ALLOW-ALL permit 100
전체 내용은 다음과 같습니다.
hostname libreswancpe
log file //bgpd.log
log stdout
router bgp 65000
 bgp router-id 10.10.10.1
 timers bgp 6 18
 neighbor 10.10.10.2 remote-as 31898
 neighbor 10.10.10.2 ebgp-multihop 255
 neighbor 10.10.10.2 timers 6 18
 neighbor 10.10.10.6 remote-as 31898
 neighbor 10.10.10.6 ebgp-multihop 255
 neighbor 10.10.10.6 timers 6 18
 address-family ipv4 unicast
  network 10.0.0.0/16
  neighbor 10.10.10.2 next-hop-self
  neighbor 10.10.10.2 soft-reconfiguration inbound
  neighbor 10.10.10.2 route-map ALLOW-ALL in
  neighbor 10.10.10.2 route-map BGP-ADVERTISE-OUT out
  neighbor 10.10.10.6 next-hop-self
  neighbor 10.10.10.6 soft-reconfiguration inbound
  neighbor 10.10.10.6 route-map ALLOW-ALL in
  neighbor 10.10.10.6 route-map BGP-ADVERTISE-OUT out
 exit-address-family
ip prefix-list BGP-OUT seq 10 permit 10.0.0.0/16
route-map BGP-ADVERTISE-OUT permit 10
 match ip address prefix-list BGP-OUT
route-map ALLOW-ALL permit 100
BGP가 자동으로 실행되도록 BGP Daemon을 활성화합니다. bgpd=yes로 변경합니다.
$ vi /etc/frr/daemons

bgpd=yes
ospfd=no
ospf6d=no
ripd=no
ripngd=no
isisd=no
pimd=no
nhrpd=no
eigrpd=no
sharpd=no
pbrd=no
bfdd=no
fabricd=no
FRR을 실행합니다.
$ systemctl enable frr.service
$ systemctl start frr.service
이제 BGP neighbor의 상태를 확인해보겠습니다.
[root@libreswancpe ~]# vtysh

Hello, this is FRRouting (version 7.5.1).
Copyright 1996-2005 Kunihiro Ishiguro, et al.

libreswancpe# sh bgp sum

IPv4 Unicast Summary:
BGP router identifier 10.10.10.1, local AS number 65000 vrf-id 0
BGP table version 3
RIB entries 5, using 960 bytes of memory
Peers 2, using 43 KiB of memory

Neighbor        V         AS   MsgRcvd   MsgSent   TblVer  InQ OutQ  Up/Down State/PfxRcd   PfxSnt
10.10.10.2      4      31898       296       296        0    0    0 00:29:22            2        1
10.10.10.6      4      31898       296       296        0    0    0 00:29:22            2        1

Total number of neighbors 2
위에서 볼 수 있듯이 접두사를 보내고 받는 것을 확인할 수 있습니다. 이제 OCI Console에서 IPSec Tunnel의 수신된 BGP 경로(BGP Routes Received)와 보급된 BGP 경로(BGP Route Advertised)를 확인합니다.
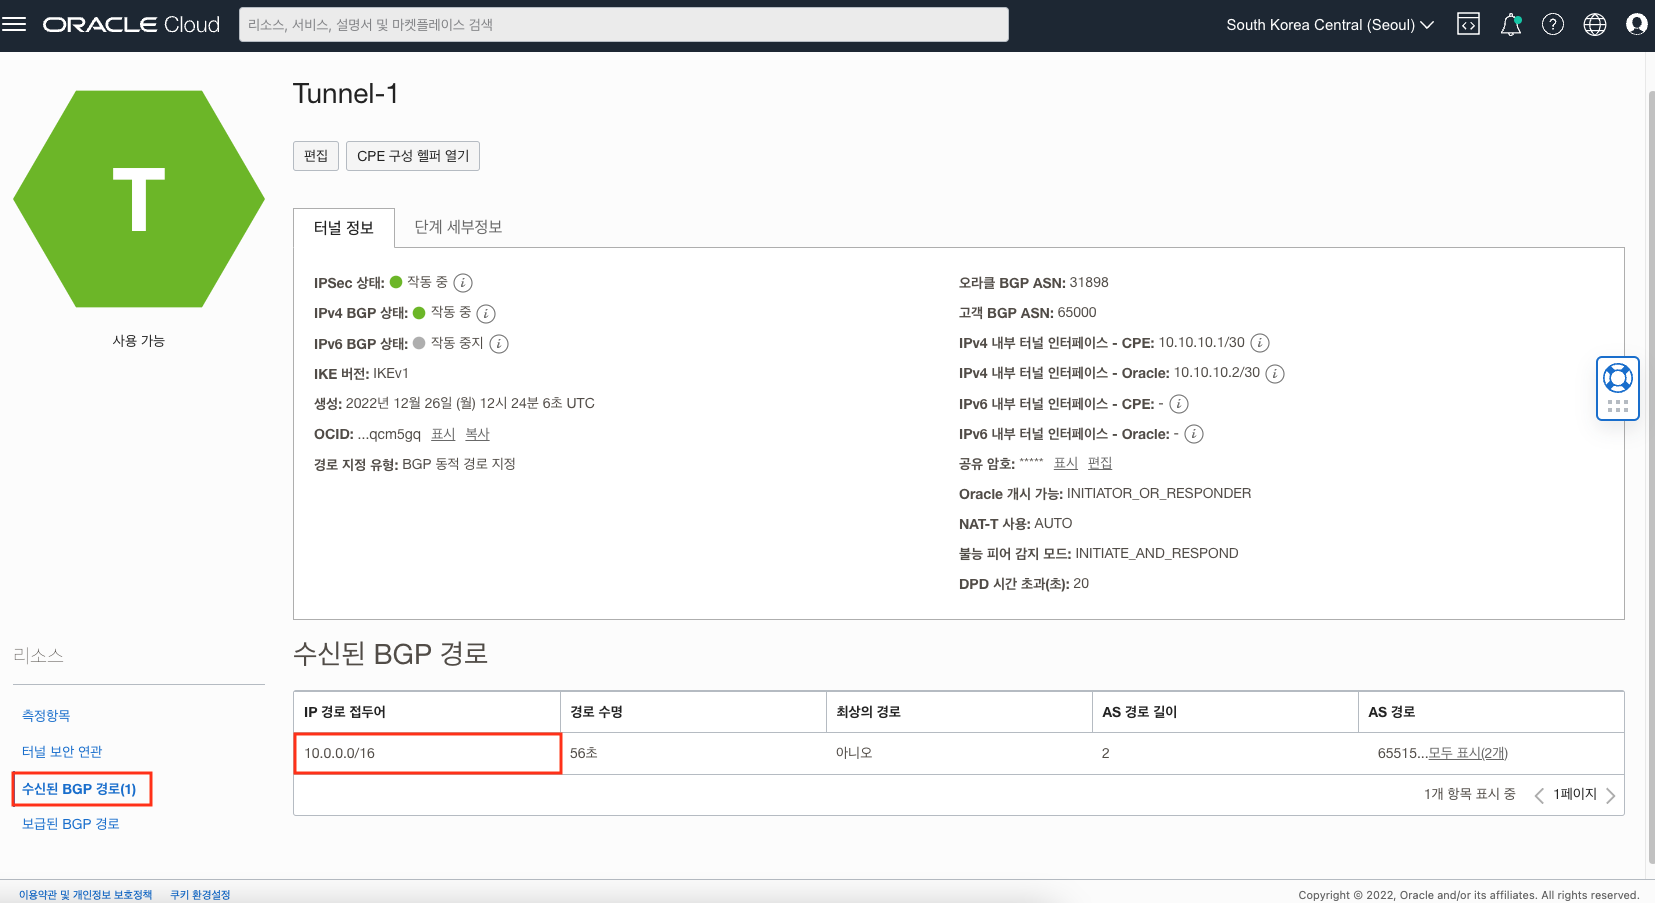
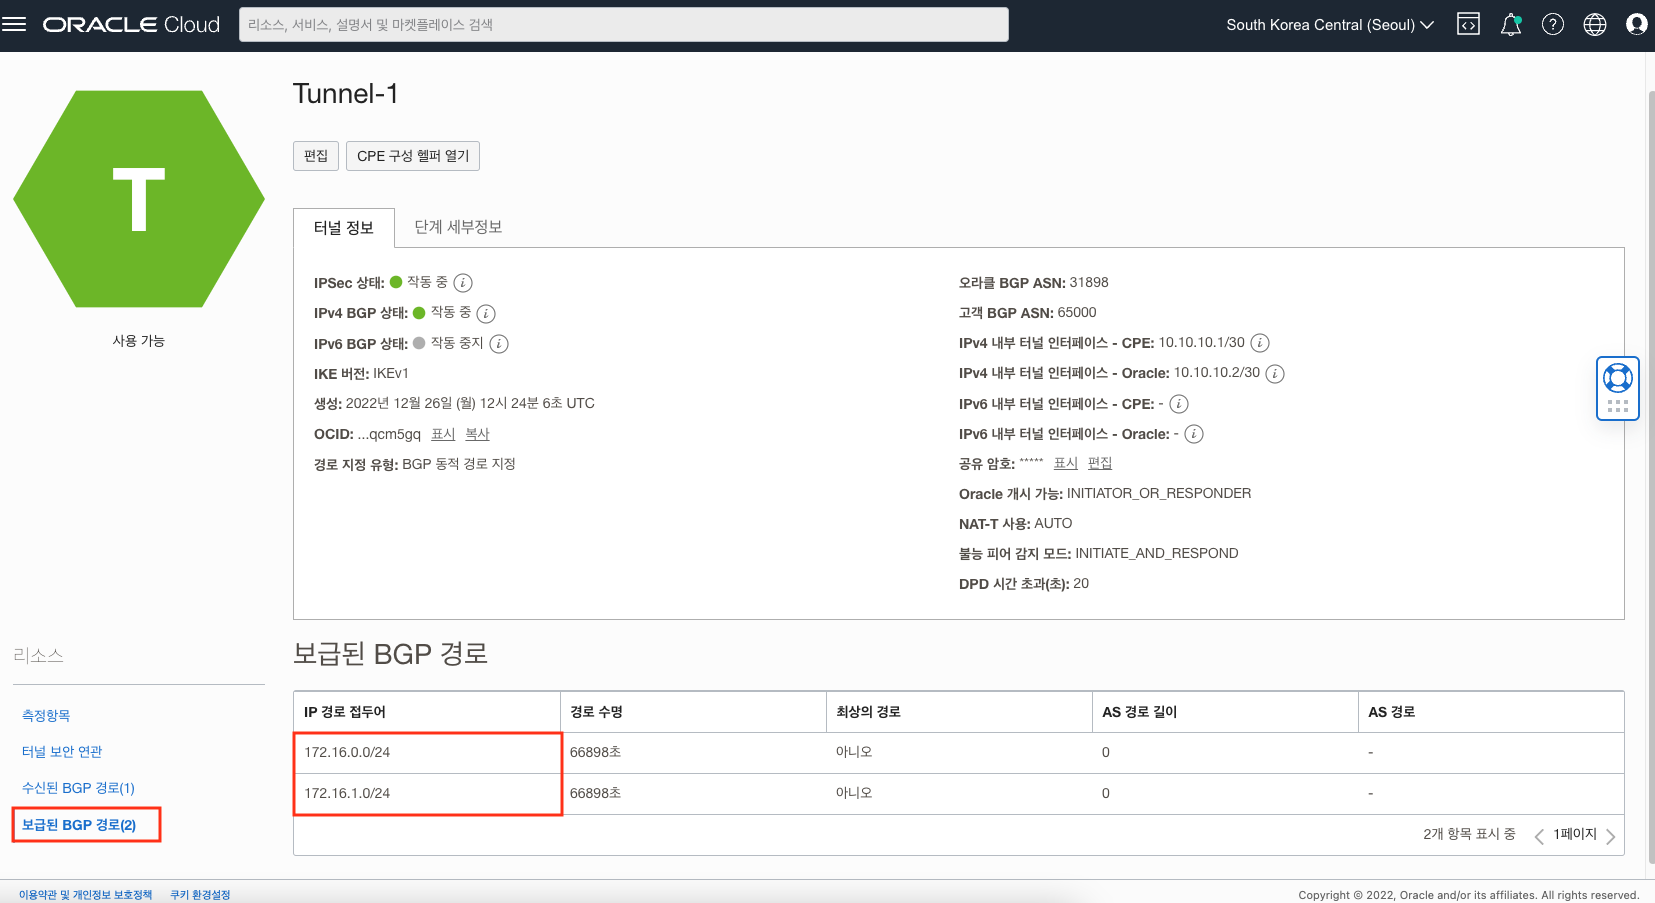
위 그림에서 보는바와 같이 온프레미스(춘천 리전, Libreswan)와 OCI 사이에 서로 경로를 송수신 하는 것을 확인할 수 있습니다.
춘천 리전(온프레미스) 경로 테이블 구성
춘천 리전의 인스턴스에서 CPE(Libreswan)를 거치도록 경로 규칙을 추가해야 합니다. CPE(Libreswan)의 Private IP로 Target을 설정해야 하는데, 이를 위해서는 Libreswan이 설치된 인스턴스의 VNIC 설정에서 소스/대상 검사 건너뛰기(Skip source/destination check)를 체크해야 합니다.
기본적으로 모든 VNIC은 각 네트워크 패킷의 헤더에 나열된 소스와 대상을 확인합니다. VNIC이 소스 또는 대상이 아니면 패킷이 삭제됩니다. 경로 테이블의 타겟으로 설정하는 것은 소스와 대상의 중간에 위치에 있다는 의미이므로, 소스/대상 검사 건너뛰기를 체크해야 합니다.
CPE(Libreswan) 인스턴스의 소스/대상 검사 건너뛰기(Skip source/destination check) 체크 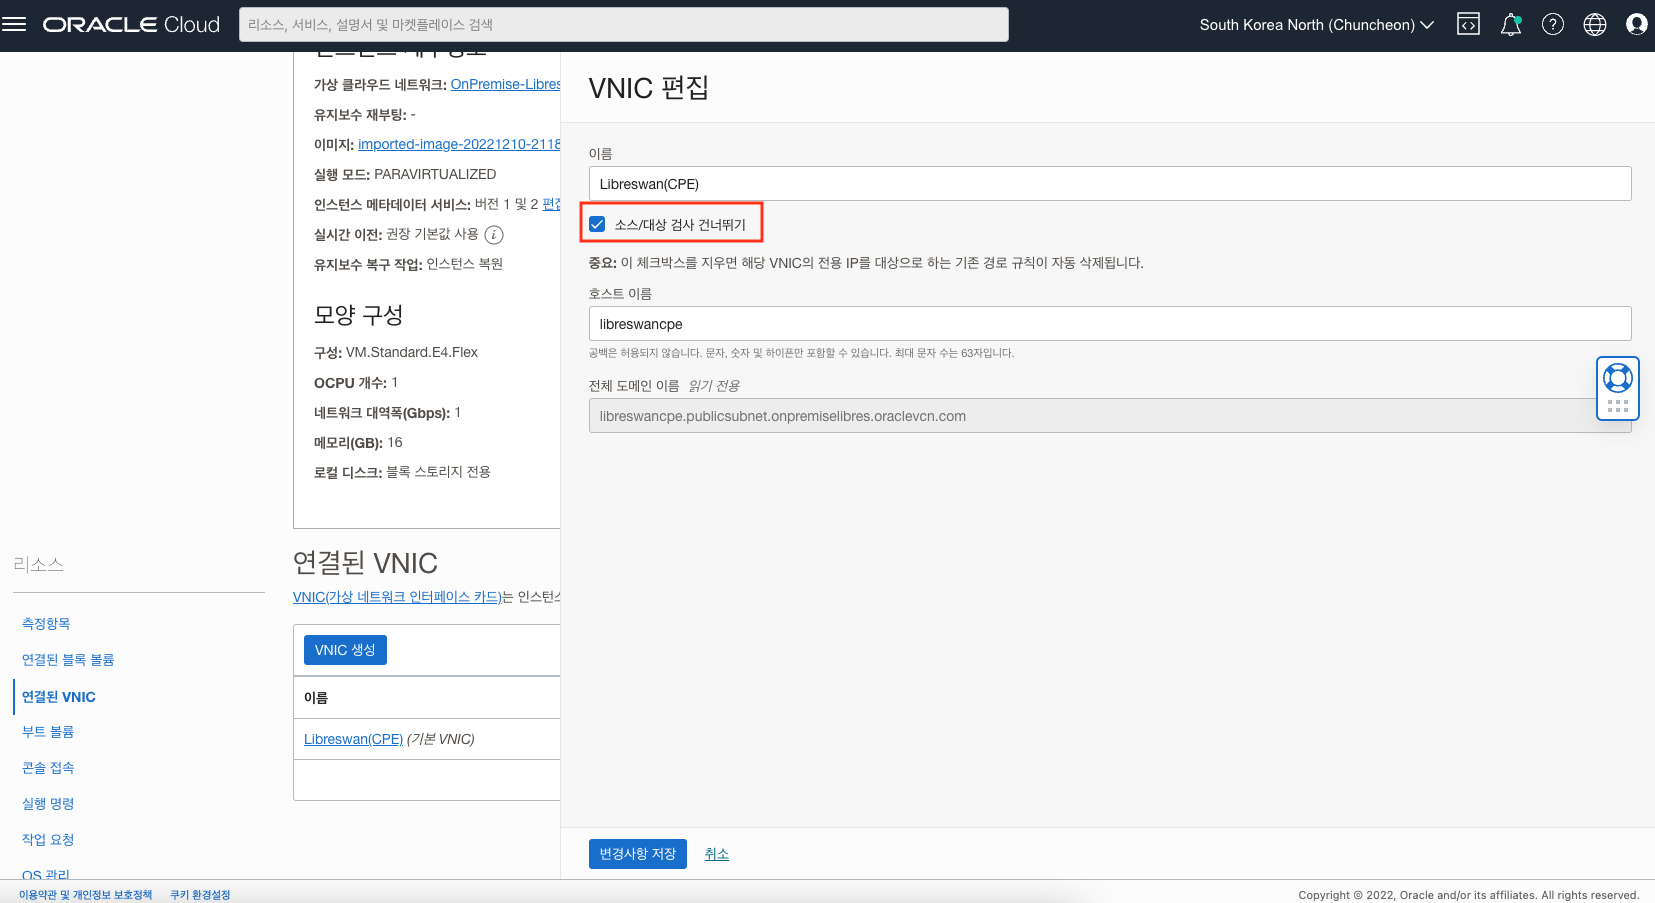
이제 CPE(Libreswan)이 있는 서브넷의 경로 규칙을 다음과 같이 추가합니다. 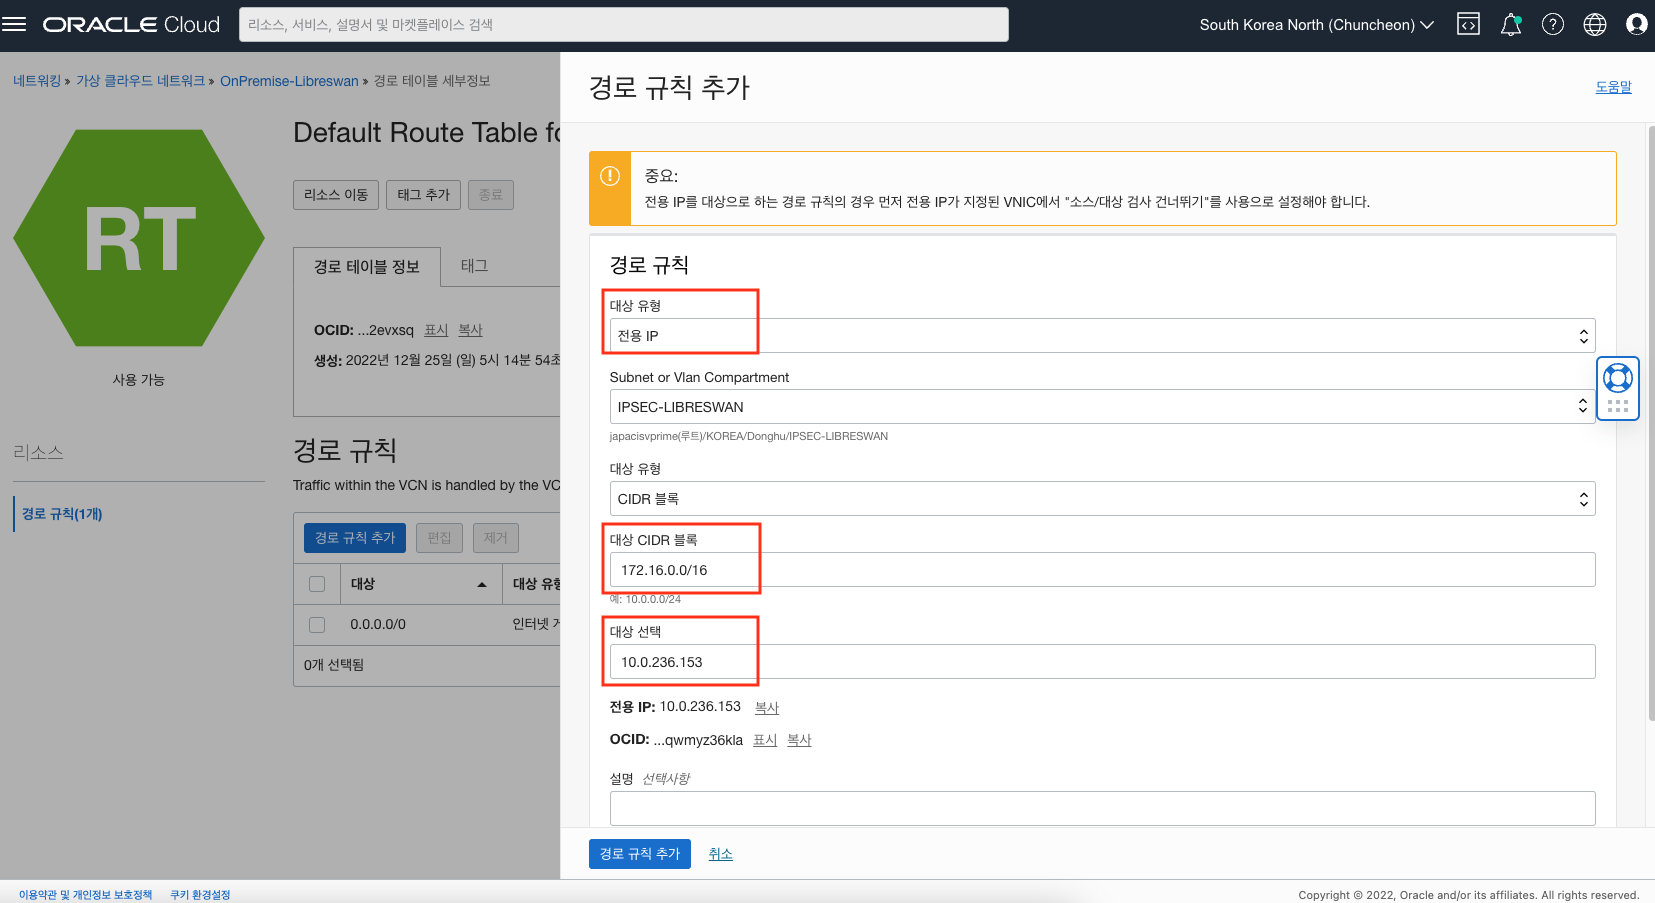
연결 테스트
먼저 춘천 리전(온프레미스)에 생성한 테스트용 인스턴스(OnPremise VM Instance-1)에 접속합니다.
$ssh -i {ssh key} opc@129.154.61.29
다음과 같이 서울 리전(OCI)에 준비한 인스턴스(OCI VM Instance-1)의 Private IP로 연결 테스트를 해보고 정상적으로 통신이 되는지 확인합니다.
[opc@onpremise-vm-instance-1 ~]$ ping 172.16.0.93
PING 172.16.0.93 (172.16.0.93) 56(84) bytes of data.
64 bytes from 172.16.0.93: icmp_seq=1 ttl=60 time=3.24 ms
64 bytes from 172.16.0.93: icmp_seq=2 ttl=60 time=2.99 ms
64 bytes from 172.16.0.93: icmp_seq=3 ttl=60 time=3.02 ms
이번에는 서울 리전(OCI)에 생성한 테스트용 인스턴스(OCI VM Instance-1)에 접속합니다.
$ssh -i {ssh key} opc@146.56.156.213
다음과 같이 춘천 리전(온프레미스)에 준비한 인스턴스(OnPremise VM Instance-1)의 Private IP로 연결 테스트를 해보고 정상적으로 통신이 되는지 확인합니다.
[opc@oci-vm-instance-1 ~]$ ping 10.0.85.10
PING 10.0.85.10 (10.0.85.10) 56(84) bytes of data.
64 bytes from 10.0.85.10: icmp_seq=1 ttl=61 time=2.93 ms
64 bytes from 10.0.85.10: icmp_seq=2 ttl=61 time=2.98 ms
64 bytes from 10.0.85.10: icmp_seq=3 ttl=61 time=2.97 ms
DanKim INFRASTRUCTURE
oci networking vpn ipsec libreswan